|
BODYTECH
#
A brief history of the production of Body Story can be found here INTRODUCTION This article is intended to represent a brief insight into some of the technical aspects of the Rendering and shading that was used on the Body Story project. You may know that we used Renderman for over 95% of the rendering. For most of the shader sets we used a combination of in-house magic surface and magic light shaders. The magic surface/shader model operates by a piece of geometry having a single magic surface shader attached then any number of magic lights layered on top. These light shaders can be switched to function in any mode (specular, diffuse, bump, displacement, colour etc..) so in practice, shading an object is rather like compositing, adding different effects one on top of another. Because a separate shader exists for each shading component (e.g. 1 magic light for the high frequency bump, another for the low frequency bump) the level of control is unparalleled.
MAGIC SURFACE, LIGHT, NOISE The magic lights/surfaces that we used were custom written by Jonathan Stroud. They are far more extensive that the stock code that you get with Renderman and they can be used in all sorts of weird and wonderful ways. In early 2000 Jonathan consolidated these in house shaders by adding features that were going to be necessary for Body Story. Not only did they include a high degree of rolloff control to alter the relationship between shader strength and surface normal to camera, but they also had a host of layering modes built in. Magic lights could not only blend their effect with layers below but also subtract, add, multiply, offset the saturation of lower layers and amongst many other modes, perform a min and maximum function between 2 layers (rather like the transfer modes in photoshop layers). They also had other powerful tricks written in like front facing falloff (which we shall learn about later), holographic effects and advanced reference geometry usage (baking the texture application at a specific frame to avoid texture swimming during deformation or translation/rotation/scaling). From the very start of the project we knew that we were going to be dealing with shots with large amounts of geometry. It was therefore deemed that we should be texturing, in the main, on a procedural level rather than painting maps by hand. If you have literally hundreds of eggs in a scene, it makes sense to apply a large procedural displacement map to give variation across all the different eggs and then bake that mapping in if they are deformed or moved in any way (to avoid swimming). Although on occasion, we did make maps by hand in photoshop (particularly for hero objects), the main technique for handling so much geometry was to write decent procedural shaders as magic lights that could be layered in with all the other shading characteristics. Jonathan Stroud came up with Magic Noise, Magic Voronoi shaders (giving different cellular type patterns), Magic Spot shaders amongst others. As these were magic lights, they could be applied in any mode - as a colour or a bump, specular, displacement etc.. They included lots of pattern generation controls and randomization functions to ensure that the end results were believable and not particularly "3d" looking. In many instances, a few of them would be used in conjunction on any one parameter (e.g. displacement - high and low frequencies) to create a more complex and believable pattern.
THE CHARACTER Body Story - in the main - is characterized by geometry that has low diffuse shading settings, high multilayered levels of incandescence with varying degrees of positive and negative rolloff, and finely detailed bump and displacement. Colours are often muted and unsaturated as the complex incandescence sets give the object its colour and life. In Body Story 2, specular highlights do not exist. Environmentally, the key Body Story signatures are strong fog levels, narrow depth of field and the existence of floating detritus or debris. Our cameras had controls on to easily and quickly adjust depth of field focus distance and f-stop and also adjust the fog density by clip plane movement. Although a minority of shots were rendered with depth matts and the dof was composited in, most of the shots were rendered with dof actually in camera.
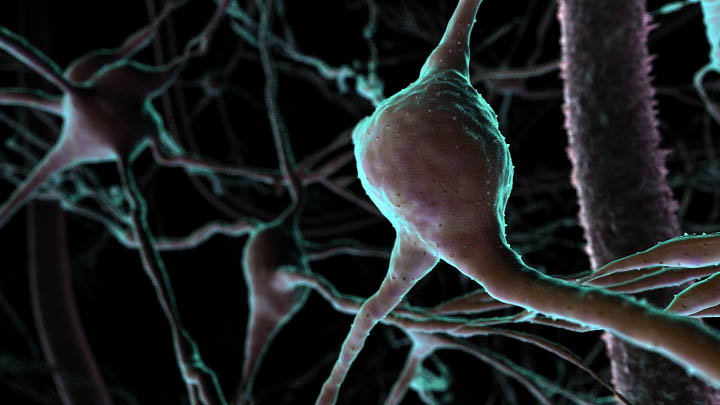
LIT vs NON-LIT One key feature of the shading is the separation of the lit and non-lit sides of an object. If you just layer a load of different coloured and different rolloff incandescence on an object it will sooner or later look to be rim lit right around all its edges. We needed to get round this, forcing our incandescence to follow some sort of lighting model, otherwise you end up with very flat looking pictures. Jonathan Stroud wrote in the front facing falloff feature into all our magic lights. Using this method we were able to project a magic light (say in incandescence mode) through our main Maya Directional light which was representing the main scene lighting. With the front facing falloff controls we were able to tell the shader only to effect the first surface it hits on any given object and then fade off over a given distance at a given rate. By doing this, incandescence (or any other property for that matter) could be excluded on the non-lit or shadowed side of an object. Alternatively, we could have one type of incandescence on the lit side of an object (like a bright colour) and a dark, different colour incandescence on the non-lit side. This technique was crucial to many of the objects seen in Body Story, most notably the brain.
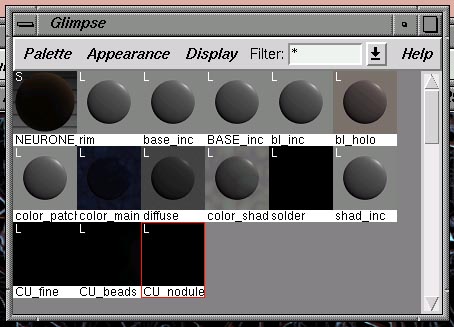
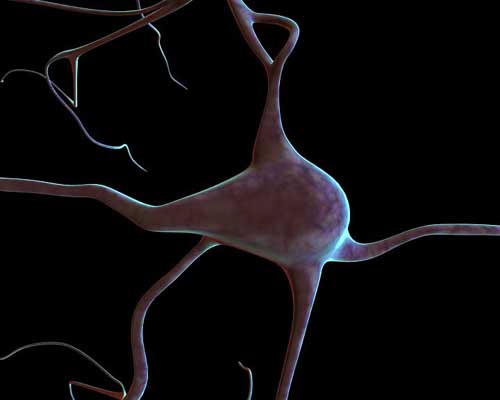
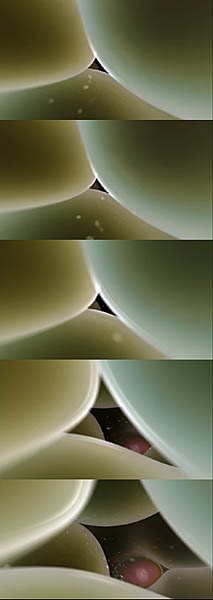
THE BRAIN Using the Brain as an example, I can show you how a typical Body Story element was shaded. Here is a snapshot of the brain palette showing the magic surface shader attached (NEURON) and then 14 magic lights on top of that.
Here we see a brain neuron with just its main colour shader attached (the magic light color_main as seen in the palette). This is a magic noise shader that is tinted blue and is also affected by a colour remap giving slight variation in the hue and saturation across the surface. It represents a reasonably organic starting point. Note how the diffuse value of the surface is low and also rolled off with respect the surface normal to camera. So in the centre of the spherical cell body, the colour appears darker. It is the edges that receive the most diffuse light.
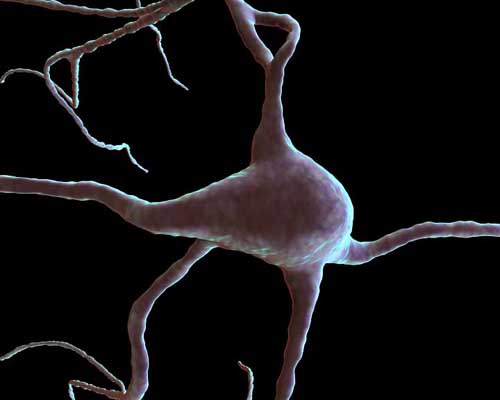
Okay, now we have added the colour_patch shader. This produces yet more variation in the colour, pulling in brighter bits and cyan/purple patches. Again, this is a magic noise shader, a fractal based pattern but the light's opacity is again based on a black and white 3d fractal so it will only effect certain areas of the geometry - where the shader's alpha is black, there will be no visible effect.
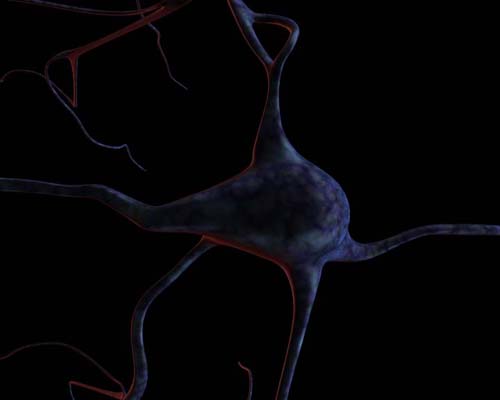
Now we have added bl_inc (or "blood incandescence"). This is a magic light in incandescence mode but it is projected through an mtor co-ordinate system which is aligned with the light in our scene. By having "front facing falloff" turned on in the shader, the red incandescence will only appear on the non-lit side of the object. Its a nice dark and moody colour so it works well at the shadowed side of the brain.
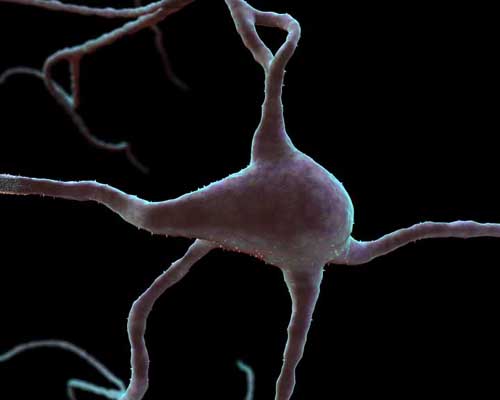
The next layer to go on is "rim". This is another magic light in incandescence mode but the rolloff is quite tight with the rolloff bias and gain settings adjusted accordingly. Consequently we only get this striking blue incandescence on the very edges of the geometry where the surface is pretty much at right angles to the camera direction. Once again, this shader is projected on the lit side only - you'll notice that it does not exists where our previous blood/red inc. is strongest.
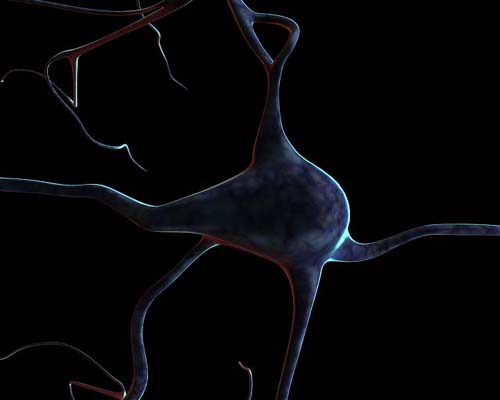
Quite subtle this one but nevertheless important. We have added "base_inc". Its similar to the rim shader above but a slightly different shade of blue incandescence and also the rolloff is much softer or less tight. In effect, it merges the rim incandescence in a more graduated fashion.
Okay, a bit of a big jump here I know. We have added the "bl_holo" magic light. This is a special holographic magic light developed at the Moving Picture Company.In the configuration used here, it is adding 2 coloured incandescence layers (orange-ish and purple) on the left and right hand sides of the object. Although the leap from the previous image to this one seems strange, do remember that the brain was not designed specifically in the order. The colour shaders seen before were altered and changed once this shader was in place. Although it doesn't seem like it, the original blues we had in the last picture directly affect the final colours here - and obviously the organic patterns are still in place.
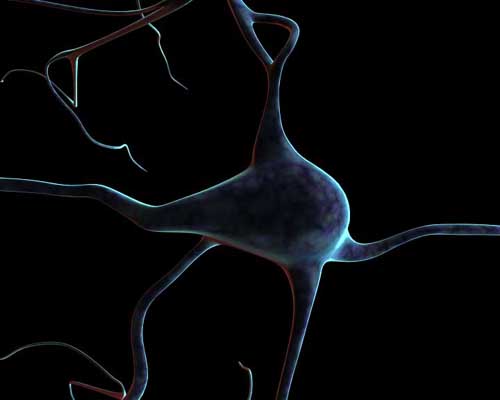
Here we have added "BASE_inc". This is a general layer of white incandescence with pretty soft rolloff. Its effect is to brighten the neuron overall and also make it look less rim-lit.
Now we have attached the "solder" and "CU_beads" magic lights. These are in displacement modes and are 3d magic noise shaders, noise based shaders adding displacement. Having 2 combined at different frequencies greatly enhances the realism and allows you to lose the "procedural" look somewhat.
Finally we add "CU fine", a fine bump noise and "CU nodules", another displacement shader which gives us the little nodule bumps on the brain cell.
DYNAMIC SHADING From the very start, I investigated ways in which to dynamically change the shading of Body Story objects, like on the fly. Throughout, most shaders on objects were rolled off to some degree and also separated out to the lit and non-lit sides, so that would ensure that shading would change and mutate when geometry or the camera itself moved in the scene. But I considered that the more shading that was in a state of change or flux, the better - ultimately it would make for much more interesting viewing. One of the very early techniques that I developed was the "dissolve volume". There was a shot that involved the camera squeezing through these tightly packed sertoli cells (in the testes). The shading was quite basic but pretty effective but I figured that it would be good to have some dynamic change during the shot. These cells were created from an outer and inner wall and I figured that when the camera got really really close to them, squeezing through them, the transparency could change in some way. What I did was to make a series of mtor co-ordinate systems which defined a sort of cylindrical volume just in front of the camera lens. I created two further magic light shaders to be layered on the cells outer surfaces and the shaders were such that they only came into play if the geometry was inside my "dissolve volume". Only then did the transparency reduce dramatically and the overall incandescence properties were also change. The result, as you can see below was pretty effective, changing when the camera got close and distant to the cells edges, exposing the bright inner surface.
Similar methods were used elsewhere. In some brain shots, we applied a shader called "Holo_Close" which was a new and different layer of coloured incandescence which only came into play when the camera was extremely close to an neuron. This was achieved by setting the shaders alpha (or intensity) to a black white ramp which was projected out from the camera lens. Another technique developed was shading with respect to camera speed. We had some mel written which would calculate the camera's velocity and then feed this into a shader's opacity. I tested this on the brain where the neurons were tarnished a certain colour whenever the camera moved quickly. Although it looked and worked very well, it was sadly never implemented. Another feature that I developed was double-imaging where under a set of given conditions a ghostly oversized "spectre" of an element would dissolve into view. For some of the molecular shots, parts of an element's geometry were duplicated and scaled slightly larger but the visibility of these duplicates or rather the double-image effect, only came into play when close to the camera or oriented to the camera in a certain fashion. This was again achieved by magic light shaders working in "multiply" mode, governing final opacity and incandescence levels. The shaders' opacity or strength of effect was dictated by black to white ramps projected out from the camera. Unfortunately, this somewhat seductive visual effect proved quite costly in most cases and was not nearly used enough. Still, there's always next time.......
EYESPLIT PROBLEMS "Cannot split primitive at eye plane"... boy was that a common error message in alfred for us ! In one of the Renderman books it states categorically that Renderman is very bad at doing a "worms-eye view" of the world. Body Story, in many instances, was just that. This problem was not only the bane of Body Story but is the result of the worst single algorithmic limitation of the REYES algorithm that Rman uses. Allow me to explain a little. Put simply, the renderer bounds primitives (kind of allots them geometric space where they will be) then has to sort them into buckets based on their position in raster space. The maths of perspective projection to achieve this only works for positions in front of the camera, not behind. So when an object falls astride the camera lens plane it has to be split into areas that are in front and areas that are behind. Whilst most renderers would simply clip the geometry with the camera front clip plane the Rman REYES pipelines require subprimitives that are cleanly rectangular in parametric space (clipping doesn't give you this) so instead, REYES has to split the primitive in the hope that portions of smaller subprimitives will be easier to classify and resolve. Specifically, the problem only occurs with geometry that lies both in front and behind the camera. When the renderer tries to successfully split the primitive, if it can do so in the 3d space between the lens or eye plane of the camera and the front camera clipping plane (called the safety zone) then the portions of the primitive between this split are classifiable and that which is in front of the camera can be rendered. If splitting in the safety zone cannot occur, even after the maximum number of cumulative attempts at splitting (and this can take a long time to do) then the primitive is discarded, not rendered and the above error message is given. Obviously then, the first solution for us was to try to try to maximise the distance of our eye plane and front clip plane by moving the front clip as far forward as is possible until just before it starts to actually clip visible geometry in the viewport. This is maximising the safety zone and hence the chance that REYES will successfully split the primitive within it. For some shots we actually had to resort to repositioning the camera further back them zooming in with a different focal length, thus increasing the safety zone further. Additionally, we had some scripts written to hide objects and particles once they were past the camera or not visible in the viewport. But two other factors may exacerbate the eye splits problem considerably, that is large displacement bounds on objects straddling the camera and objects moving fast toward or away from it (particularly with motion blur on). This is because splitting these objects will do very little in reducing their bounding box because, due to moblur and displacement bounds, their bounding boxes are already overlarge. In some cases where the camera is inside the displacement bound part of the surface (the extra bit of bounding box) or where primitives actually goes through the camera , splitting can never succeed - a render will never take place !. In these instances we had to carefully maximise our displacement bound efficiency, reducing the bounds successively till just before the point when cracks artefacts appear (when the geometry is displaced further than the bound size and is therefore clipped, giving black cracks in the render). Sometimes, we had to reduce or even turn off displacement completely for key objects and in the very worst cases, when geometry or particles were moving past camera, we had to adjust their final few frames of animation so that they moved further away from the camera before passing it and re-render.
MORE..... > Body Story 2 can be purchased on video & dvd from www.discovery.com or from this direct link > Channel 4 created their own Body Story sub site just before launch > Body Story was selected to appear in teh 2001 Sigraph electronic theatre > Body Story won 1st place in the Education/simulation/training category at the 2001 VEAF (Vancouver Effects and Animation Festival). Details can be found at VEAF's site. >
download
the latest 3min40 2001 bodystory2 showreel at the Forge here > Body Story won the Special Animation award at London's LEAF festival. A shortened compilation reel of the LEAF entry, excerpts from "Puberty" and "Hunger" episodes, can be downloaded from the Moving Picture Company website - click to download direct: Quicktime
(4023kB) > A brief history of the production of Body Story can be found at the Forge here > Full credits can be found here
Richard C. Morris 2000 |