| click
on the pics for larger versions
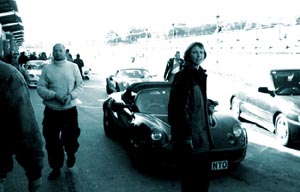
BRANDS HATCH INDY (18/10/99) A
much shorter distance from Central London this time but nevertheless
we were up at 6am and off through Battersea, Catford and Blackheath
in time for rush hour. At the track it was soon obvious that a lot
of people were turning up and that things would be on tthe crowded
side. Plenty of Caterhams as usual, a large number a 911's, lots of
race vehicles and various oddities like an Evo II integrale, Lotus
excel, a chimeara (why do the TVR's always turn up alone) a Ford Anglia
and a couple of skylines. Weather was very bright and sunny but pretty
cold with a very chilly wind.
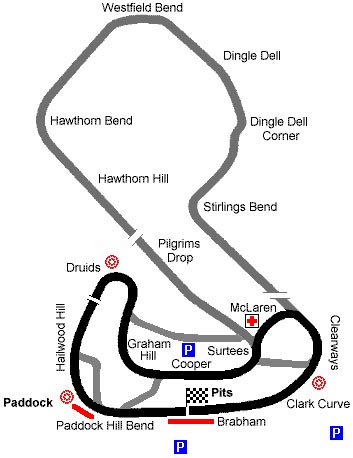
After circuit familiarisation which was easy to take in, we had the main club briefing and the overiding point seems to be that Brands Indy, whilst simple, is fairly intense and the bends come thick and fast, keeping you well on your toes. Also, plenty of height variation and I really couldn't wait to try out paddock and then sharply sink down then back up toward druids. From the back of the pits it looked mouthwatering stuff.
The
first session was a great indicator of just what a fantastic day this
would turn out to be. After just a few laps I felt that I knew my
way around pretty well and was starting to get into my lines and construct
a nice flowing thread through the whole length of tarmac. First big
impressions had to be Paddock and its lovely steep downhill exit.
Also, the section from the apex of Clearways to the straight immediately
felt gloriously natural and very satisfying in the acceleration department.
All
the way from Clearways it is flat acceleration down the rhs of the
Brabham Straight. Before my tuition session with the club chief instructor
I was getting this approach quite wrong (although it always felt good)
and was coming down the straight in the centre and drifting to left
of track about halfway, well before Paddock. Although most other cars
there seemed to be doing the same thing I was taught to stay right
down the Brabham Straight, all the way until the just before the exit
mouth of the pit lane. The reason for this is that the straight is
higher further away from the pits (i.e. the left hand side) so by
keeping right you use the downhill aspect to help your straight line
speed. Also, by crossing the track late you move to the lhs as you
brake for Paddock so you are moving slightly uphill and this helps
your retardation.
However I never worked on it too much as I always wanted the car to be 100% settled into Paddock and I was put off teasing out the cars braking limits after I messed it all up on a few occasions and felt like I was going to carry straight on into the gravel trap on turning in. Also, late in the day a lot of tyre marks had gathered on the end of the straight and the track had definitely started to become a little slippery here. It is a tricky one to solve becuase the turn in is blind and often I found myself braking way before the crest in the track only to rise and find that I had some way to go before turning in. In a sense this is one you have to work out rather than feel. Paddock
Hill is an exceptional bend and the key to a good lap. Its pretty
quick and needs a very comfortable medium amount of lock. Its apex
is hidden till you start to ascend the end of the straight and only
then is the exit also visible. It took a little time for me to get
enough lock on and initially I found it quite deceiving, running well
wide of the apex. But best go as close as you can then immediately
unwind and let the car drift right out as you squeeze the throttle
quite hard and descend rapidly, hitting the compression. I am told
that things can get hairy here but in the elise as long as you've
gone in at a sensible speed and you keep the turn and the power delivery
nice and progressive, the dip won't be a problem. At the compression
you are flat to the boards and you can slowly let the car run well
left to touch the rumble strip up Halliwood Hill, using as much of
the track as possible to improve speed. HALLIWOOD HILL + DRUIDS Paddock is 3rd for me so after the compression the vvc was already screaming blue murder. As you finally starighten up well left of track you are going up the beginning of Halliwood Hill and its 4th (about 85mph for me from memory) for a brief period before braking for Druids. Braking here is quite reassuring as you have the steep gradient to help, and lots of open space in front of you beyond the track should you cock it all up ! I did the usual later braking routine at each session but I reckon that there's still lots of room for improvement here for me. I never felt that close to maximising the complete distance to the turn-in for Druids so maybe I'll leave it all even later next time. You can't see a great deal coming up the hill so its one to work out at every lap. From memory I reckon that if you drew a straight line up the rhs edge of the track at Halliwood Hill and then extended that line, where it hit the back (or lhs) of the track would be about the turn in point for Druids. Maybe slightly further round though as you do seem to be pointing right a little at the end of the hill and whilst braking. I am told that this is not the competitive line however, as it leaves you far too exposed for overtaking. Lets not worry about that then. Down
to 3rd and around 40-45mph (although I did try 2nd but preferred 3rd
- whether it was quicker or not I do not know) and turn in with lots
of lock, immediately back on the throttle and keep it steady whilst
you pass the apex and start to arc round. You are now facing the other
way (as opposed to Halliwood Hill) and you can't really accelerate
much as the car is still tight and needs to get back over. You reach
about 2/3 of the way across the track then the car gently comes back
over to the right and you are then flat to the boards, negotiating
the little righthanded kink on the approach to the Graham Hill bend.
GRAHAM HILL BEND + COOPER STRAIGHT You're going downhill here so it all feels quite fast and I found it a little unnerving at times. There's this kink to get round and then you have to straighten your car for braking - it all happens in quite a short distance. Graham
Hill bend was my least favourite at Brands. I believe it used to be
flat-out but now they have changed it. During my second session I
completely cocked this one up, aiming for the middle of the track
probably instead of the apex. Of course I ran well wide on the exit
and my wheels went beyond the rumble strip into the mud and bashed
into the club's exit point cone.
After
the apex you are steady on the throttle, trying to create a straight
line through the apex of McClaren and using the rumble strips. You're
speed stays pretty constant and you have to line the car up well and
get it all nice and tidy in preparation for Clearways as you will
have to do a fair bit of braking. CLEARWAYS + CLARK CURVE Now we come to my other favourite bit of Brands. You end up on the lhs of track after McClaren and start braking hard. The 111s felt very stable here and there's loads of space to shed your speed. I was turning in tight at about 45mph, looking well ahead all the time to negotiate a good exit which is obviously important here for the straight. Immediately after the apex its hard on the power and unwinding the lock quite rapidly. In the morning I was holding onto the steering for far too long and only using half the track but the key is to let the car run naturally out left around the Clark Curve. I found it quite difficult to judge and needed to guage it each lap and kind of work it out more mathematically. Get
the line correct though and the car runs right to the lhs and hits
the edge and then you are turning the other way and aiming well into
the straight toward an exit point on the rhs. By using all the width,
you can gather speed much better, change into 4th through the Clark
Curve and gun down the rhs of the Brabham Straight. Its a very satisfying,
flat-out combination. The
day at Brands went very well. It wasn't too tiresome and the small
size allowed me to focus on just a small array of bends. Whilst the
safety proceedures of the club were of their usual high standard the
track was a little busy at times and I found myself having to back
off here and there in order to retreat and find myself a little pocket
of space. Approaching queues of cars and trying to get passed them
never really worked. Also, a number of cars were performing rather
raggedly to say the least and Stefan and I decided that it was high
time to move up to the more experienced intermediate group for next
time.
Secondly,
the motorsport suspension on the Factory 190 is a different kettle
of fish round the track. "how the hell do I cope with mine", I thought
after settling into a few laps in Stefan's car.
I won't drool on about the VHPD for too long. The high rev limit is fantastic, particularly coming out of the Clark Curve and down the straight. The thing just gathers speed far quicker out of the bends and responds so well to all the changing gears and heel & toeing. The Pagid motorsport pads are so much better as well. After the spongyness of my car I have to be gentle on the anchors, its easy to lock up as I am are not used to the far greater stopping power. The
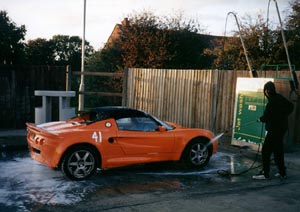
run in NTO rounded the day of nicely. I don't really want to drive
this car too much as I have my own and that's the one I have to enjoy.
But it gives a good guide as to where my car is lacking and where
it can be taken via upgrades. The suspension and seats most definitely
will be the next to go - as well as giving you more mechanical grip
these mods will make trackdays a lot less taxing on the body and far
more relaxed all round. this is not intended as a circuit guide, the views expressed here are not those of a "highly experienced racing-driver" and others may well disagree |
The Jackals Racetrack http://www.jackals-forge.com/lotus 1998 Richard Morris