|
|
|
|
|
 |
|
|
|
|
|
|
| This tutorial
is derived from a utility which I made as a result of a piece of animation
I was involved with in 1998. On page 3 you can
download the utility for your own use and see an animation as an example.
The shaker node was designed primarily as a node to simulate the effect of camera shake. Whilst creating it, however, I enjoyed myself so much that I made it rather more complex and as a result, it can be employed in many interesting ways. Just a few tests I have done include animating an object blowing in the wind, animating a heavy aircraft cruising along and through turbulence and driven animation of a shader's colour and transparency. I believe that there are many more ways in which the shaker could be used so if you download it, its up to you to investigate as you please. I know that I have spent hours playing with the controls, just watching an object jitter and wander etc.. with the time slider set to many thousands of frames - the effects can be quite addictive to watch. 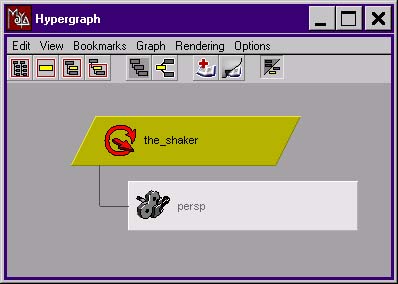
Well here it is - not that exciting. Just one node and in the diagram above I have made my camera a child to give me instant camera shake ability. The first thing I did was to create an empty node ( edit - create empty group) and name it the shaker by double clicking the node in hypergraph (my preferred way of renaming). From the attribute editor I added 4 main extra attributes (or from modify - add attribute) and then a further 21 custom attributes. (In truth, I added these at different stages of development but for the purposes of clarity lets pretend that I designed this to completion before even launching Maya). n Immediately below is a thumbnail of the shaker node's attribute editor showing all custom attributes. You should click on it now to see a full size view then come back to this page. 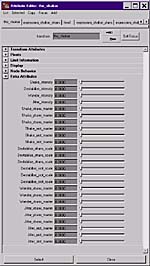
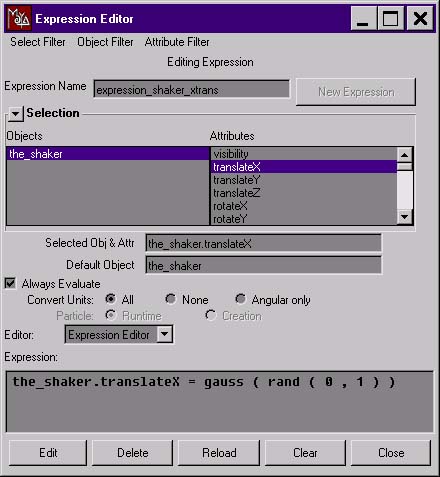
If all those attributes seem a little daunting, don't worry. All will become clear in stages. Firstly, just concentrate on the four main intensity attributes: The shaker employs these 4 different animation techniques and each is driven by an expression. All (apart from the wander property - more about that later) these properties affect the xyz translation and rotation of the node so by using them in combination, a variety of effects are possible. The remaining 21 attributes are simply fine tuning controls so that you can separate intensities of x, y, z trans and rotataion for each of the four animation techniques given above. Lets deal with each of these animation techniques, or properties in turn and consider their intensity and fine tune intensity controls later on. Shake is designed to produce a random movement and rotation at each frame. It is not just driven by a random number however. Imagine a camera shaking - to a certain extent there would be a certain distribution of movement as opposed to a completely random motion. i.e. most offset from the camera's true position would occur within a more local area of worldspace about the camera. Larger deviations ( really big shakes) would happen less frequently. The property of shake therefore creates translation and rotation by generating a random gaussian number of another random number. So the expression starts with: the_shaker.tx = ( rand ( 0 , 1 ) ) which returns a random number between 0 and 1. Then this is used to generate a gaussian random number: the_shaker.tx = ( gauss ( ( rand ( 0 , 1 ) ) ) ) At each frame a random number between 0 and 1 is generated using the 'rand (x,y)' function and then a random number of that number is generated, but one which follows a gaussian or bell shaped distibution. To help you understand better, if you were to perform gauss (1) repeatedly the results would follow the following frequency: 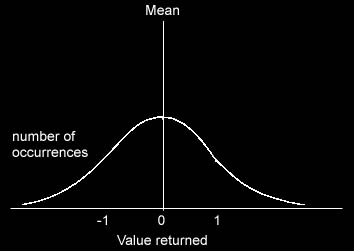
|