993 Diary - 2009 This is my 2009 993 diary of general and smaller scale modifications, maintenance and upgrades. It is in reverse chronological order so go the bottom to start at the beginning. For the latest 2010 diary go here. If you are looking for help on a problem of your own then have a look through this quick index as it may be something i've tackled or dealt with on my car: 1. airbox sound mod
20. RS uprights + EVO tie Rods Jan 2009 This is a mod I have been keen on for a long time now. It restores the correct geometry for cars that run at RS ride height, curing bumpsteer and wayward handling issues. The evo inner tie rods also make for a more direct connection between wheel and wheel. See this all on a dedicated page.
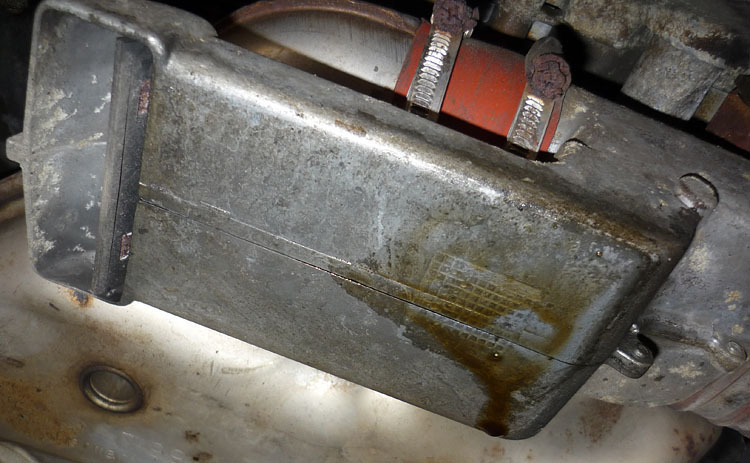
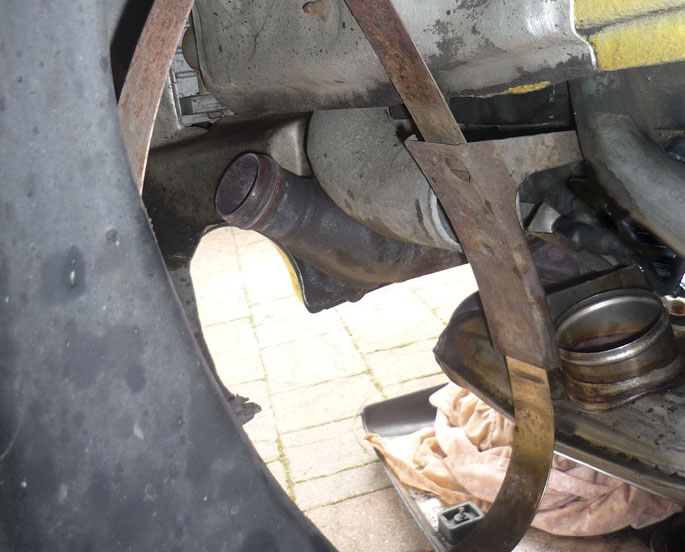
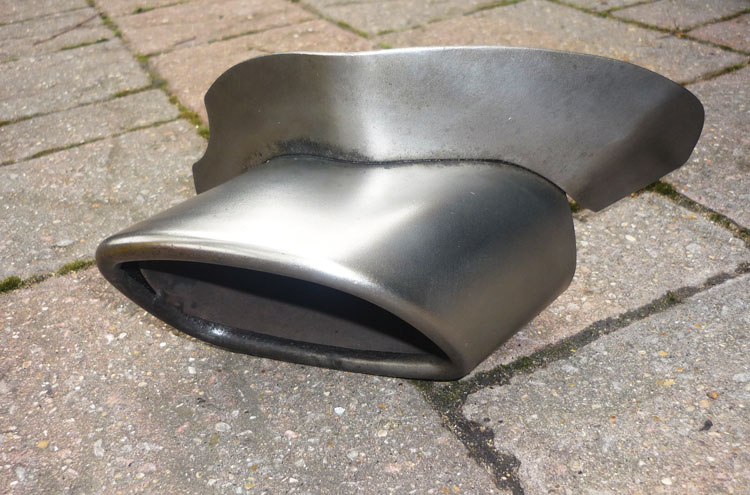
19. Aluminium Valve Covers September 2009 If you read entry 18. then you'll know that I experienced some new oil leaks after an oil top up of 5W40. The biggest of these leaks was from the offside engine valve cover. This is one of the most infamous 993 issues. Its a problem that's easy to spot. Oil will drop from one of the valve covers (usually the bottom edge) down onto the metal kidney shaped object directly below which is the heat exchanger. This is very hot as its basically part of the exhaust system and it will cook the oil resulting in clouds of smoke billowing up from the wheel arch. This can be very noticeable at the traffic lights and it will often blow forward and right past your window. Obviously its accompanied by the characteristic ell of burning oil. Note also that the two upper valve covers can and do have the same problems but the leaks from the lower ones are more common. If the leak is strong enough (as it was in my case) or if you leave the car sat there for quite a while, then the oil will run around the heat exchangers to the underside and then drop onto the engine undertray and then eventually drip over that onto your driveway. On inspection it can also appear that oil is coming from this flat looking appendage (see next picture) but don't be misled, the oil isn't coming from there but that piece gets dipped into a puddle of oil that collects on your undertray.
Let's look at the reasons why this happens so frequently:
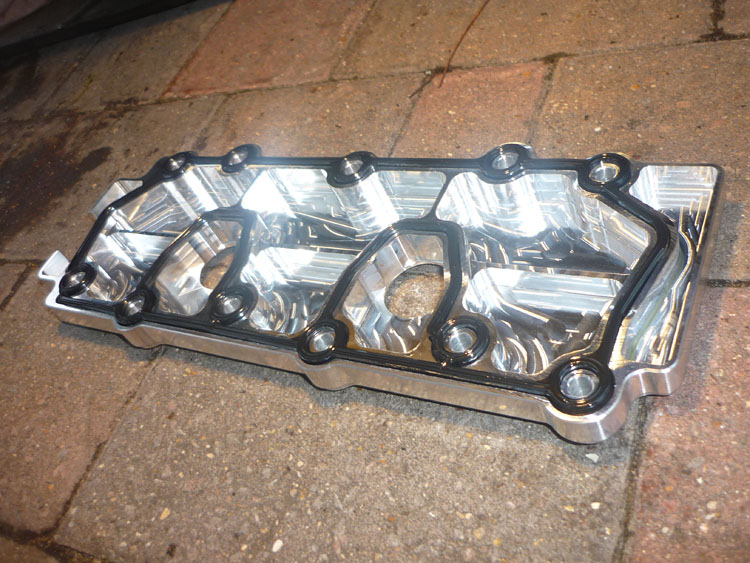
Now if you need to replace the covers then you can obviously fit new cheap OEM items and wait for them to warp again but if you are going to have the car for any length of time then a far more trustworthy and financially sensible (long term) solution is to go for some aftermarket aluminium billet covers. Various outfits make these and there are some expensive ones on the design911 website for about 500 quid I think. I opted to go for Hargett Precision covers made in the USA which have more of a rough and ready finish but are way cheaper.
Looking at how it all works out financially, these are $310, the postage is $91 and if you get by customs then you are in for a total bill of £242. Two OEM valve covers plus postage from design911 comes in at £144. So for less than £100 more, or x1.7 the price, you get covers that will last forever and won't leak as often or as much or quite possibly ever under your ownership. You can see that as soon as you've changed the covers 1.5 times you've made your money back so its a no brainer really. I personally hate design weaknesses on cars and always try to iron them out. It saves hassle in the long run and you have the peace of mind that your car is better than it was originally made. I will also be ebaying my nearside cover as it was only fitted last year so will be good as new to someone and help with costs. When you undertake this job you must get new screws (22 in total) and also a new gasket for each cover, that will be another 40 quid or so. First thing is to jack up one side of the car correctly, remove the rear wheel and then remove the rubber pipe that comes out of the heat exchanger by loosening its two worm drive hose clips. Now depending on the state of your existing valve cover screws you may be able to do the job as is, but I elected to also remove the offside muffler to make access a lot better. Another important tip is to gaffer tape up the now big gaping hole on your heat exchanger before moving onto the next stage. If you don't you can be sure you'll drop a hex key or some screws down there and chances are you will never get them out again if you do !
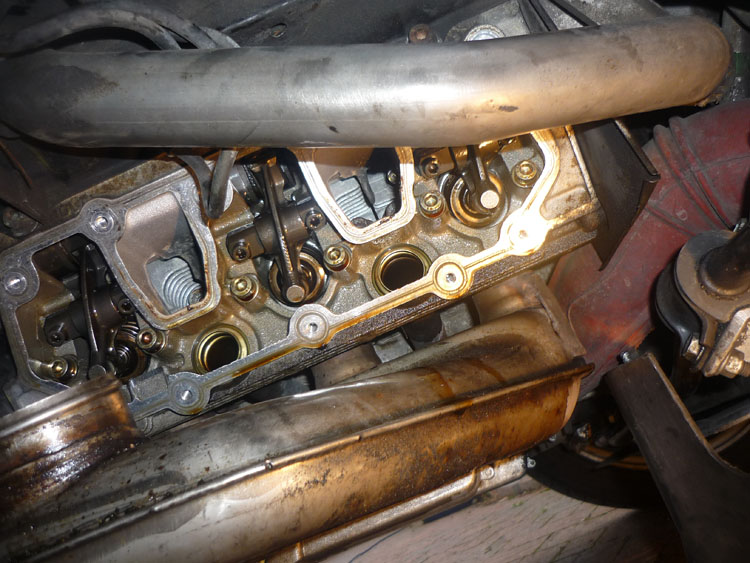
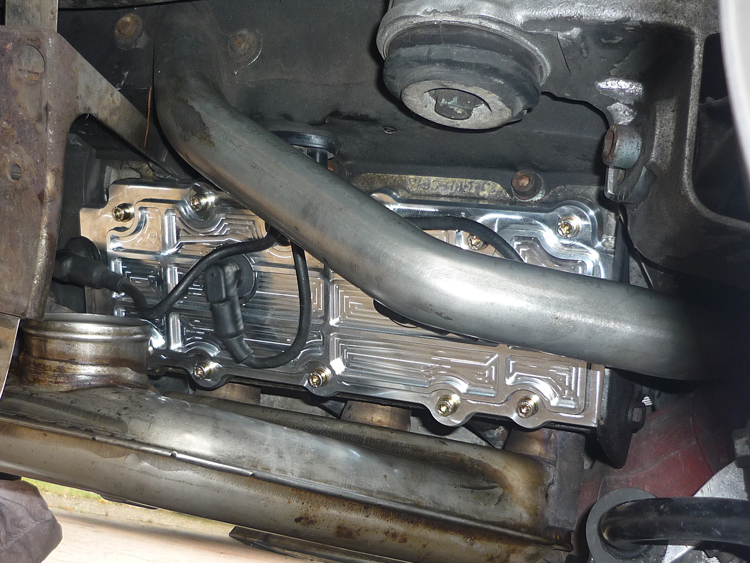
The potentially difficult part of the job comes next. Remove your spark plug leads, get them out the way (you can hook them up and over the transverse bracket that the muffler strap tightens against) and then take a look at your screws and see what sort of condition they are in. I soaked mine in penetrating fluid the night before and also had to use a small modeling knife and a wire brush on a drill to clean out the heads of rust. I sprayed them with some 'shock and unlock' as well and then used a quality hex socket where space permitted and gave them a hard abrupt tug. I was able to loosen all of them bar the two you see in the picture above. The hex shape inside the heads was totally gone and any socket just rubbed round and round when inside. If you run into this same issue (highly likely) then you have various options to help you out. The easiest thing (and how i solved mine) is to get a nice 9mm 12-sided socket and hammer it very firmly onto the head of the screw. Then simply twist it off with your favourite ratchet. If the stuck screws are some of the harder to reach ones then you may have to hammer a shallow socket on and use a shallow wrench or one of those trick sockets that can be used on the end of a spanner. Another option here is to dremel a slot across the head of the offending screw and then use a conventional flathead screwdriver socket. A word about tools. You should be able to get a socket (sometimes using a wobble extension or UJ) on all the screws bar the lower rearmost 2. For these, either use an L or T shape key, preferably with a ball end or a long hex socket will a ball end.
Once you are done, wiggle the old cover off, prising it or giving it some gentle persuasion with a mallet + screwdriver if necessary. Have some rags handy and preferably a large tray underneath to catch the oil that comes out. The next job is to prep the new cover. Apply a film of oil to the new gasket then press it into the channel. Note that the gasket has two sides, one smooth and one with a groove running along it and its this grooved side that should face upwards. Slide the cover in and up into position and then get all 11 screws in. There is a distinct way to tighten these. Like a lot of gasket seals you want even pressure around all edges so the trick is to get them finger tight working at the centre ones first then moving outward left then right, left then right etc. You will find that when you tighten the outside ones you will then have to go back and redo them all again as the centre ones will have loosened. Once they are all genuinely finger tight and can't be done any more they then need to be torqued up to the same value of 7lb/ft. Now I have a small bicycle torque wrench which is very useful in scenarios like this but you are not going to be able to use that on all of them especially the far two in the rearmost lower corner. What i did was to torque the centre ones up then again move outward in both directions and those I couldn't get a socket onto I did by feel using a small hex key. Testing out a single screw I estimated that the correct torque could be achieved by first tightening as much as I could using my fingers around the shaft of the small hex key, and then after that, turning the key a further quarter of a turn with my whole hand as per normal (or rather thats what a rennlister suggested and I checked it and arrived at the same conclusion). In this way you can eventually get all screws tightened to spec. I also took some further advice from Rennlist and set them to a slightly tighter setting of 8 lb/ft. Just make sure you don't overtighten them or tighten them unequally.
That's about it then. Be sure to replace your spark plug leads and the heat exchanger hose and then of course your muffler if you removed it for easier access. One thing to note is that you may at first experience a small bit of weeping. This is what happened to me and I also discovered some oil burning actually inside the heat exchanger (with smoke coming out of the 2 small holes on its underside) but I put this down to the oil that was on the outside of the gasket after I had lubricated it.
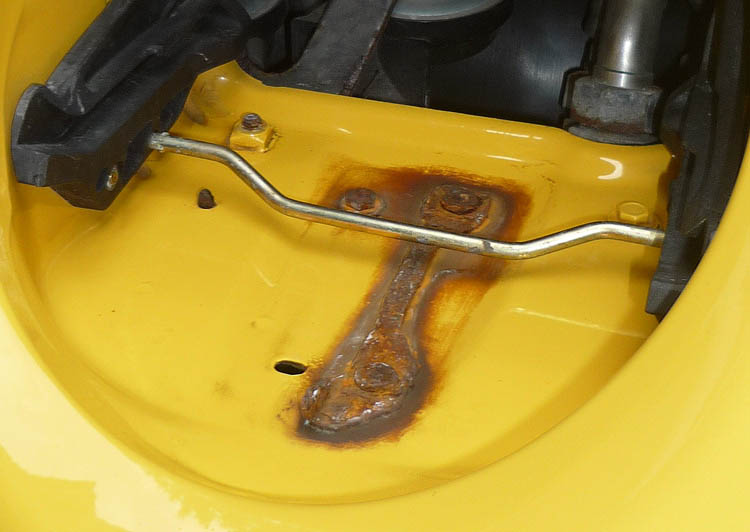
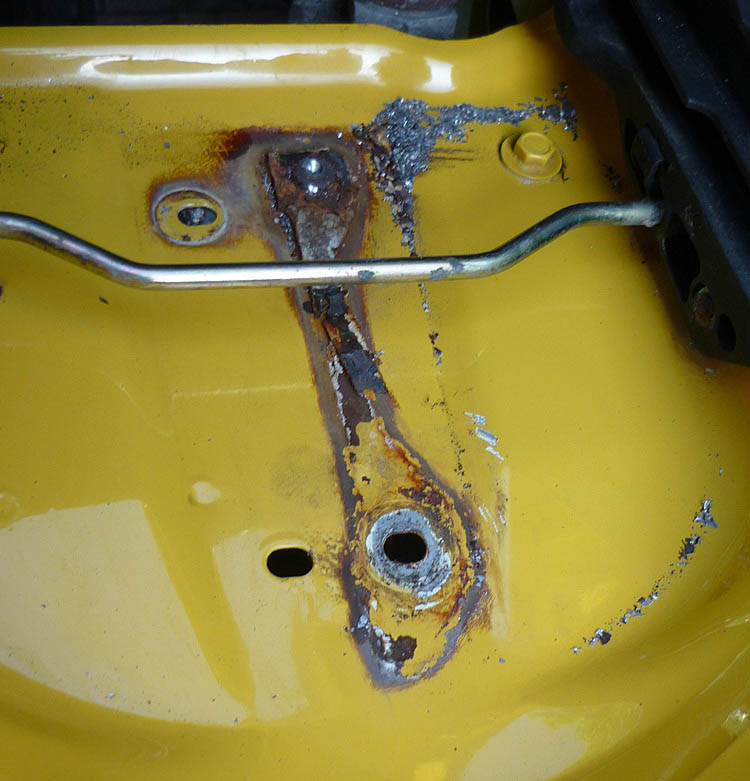
18. Chain Cover oil leak August 2009 Since I have been topping the car up with 5w40 I have noticed a bit of oil on the driveway. I whipped off the engine undertray and a quick look underneath revealed 2 problem areas. Firstly I have oil leaking form my offside valve cover and it is collecting on top of the offside heat exchanger then dripping down. This is a very well known 993 weakness and I will deal with this in a separate entry as I have some nice alloy covers coming from the USA which may be of interest. The other leak was on the nearside, around an area extending outward off of the engine.
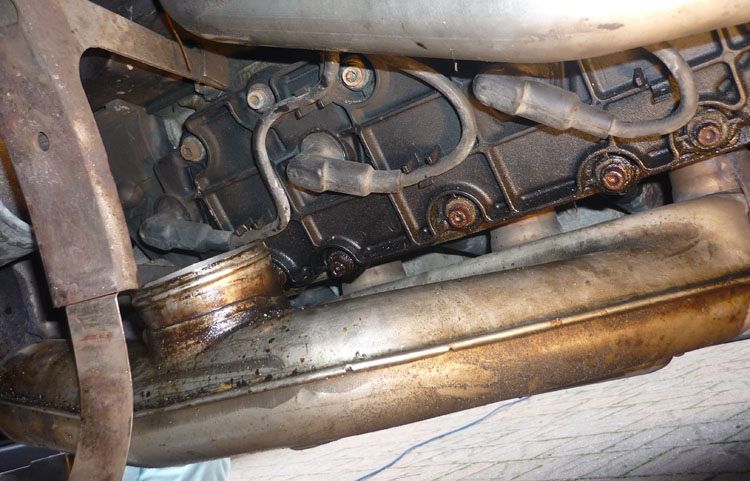
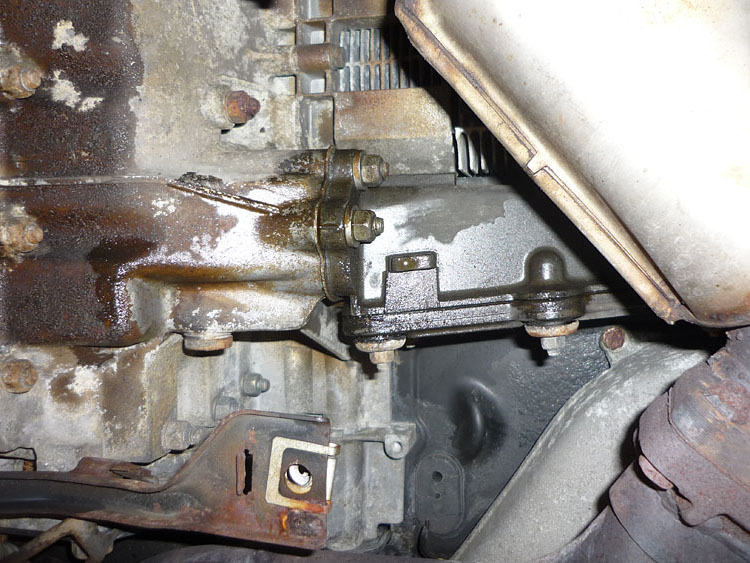
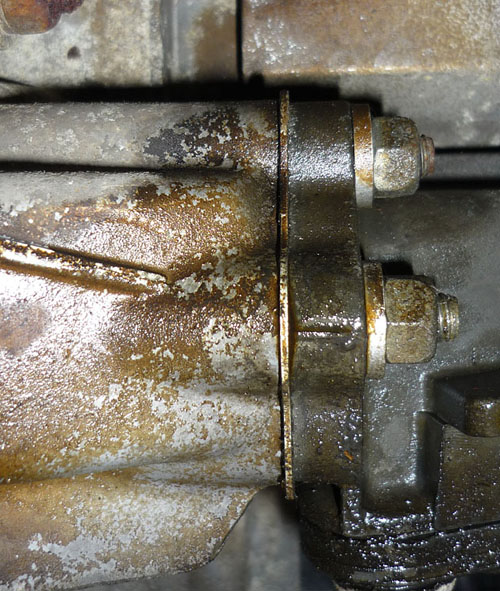
Here the top of the picture is the rear of the car and the right hand edge of the picture is the nearside. The compartment extruding out from the engine there is the chain case. This is quite a common source of leaks and there are basically 2 areas to watch.
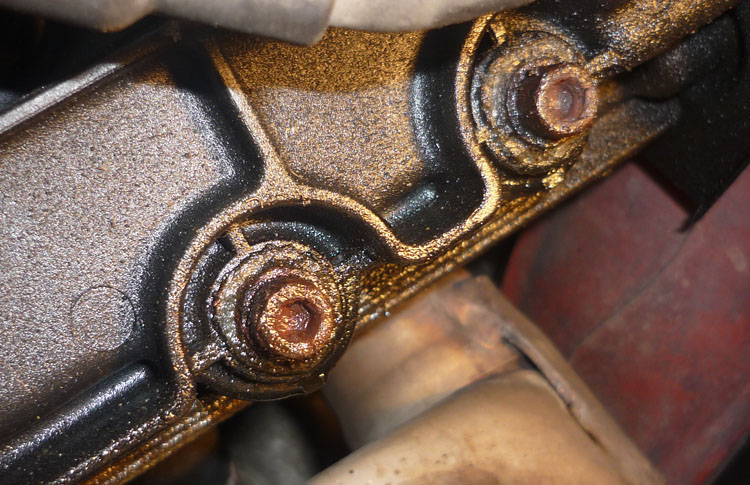
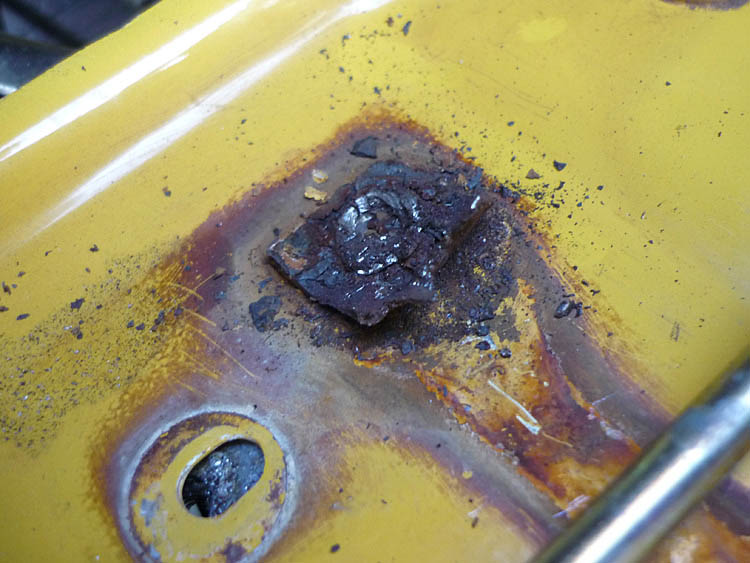
Here we are looking closer at where the chain case meets the crankcase. You can see that there is a metal gasket here. I seem to be getting a small weep from this area. I ensured that all the bolts here were tightened up properly. The torque setting is 23nm. Do not overtighten and ensure that all are tightened by the same amount.
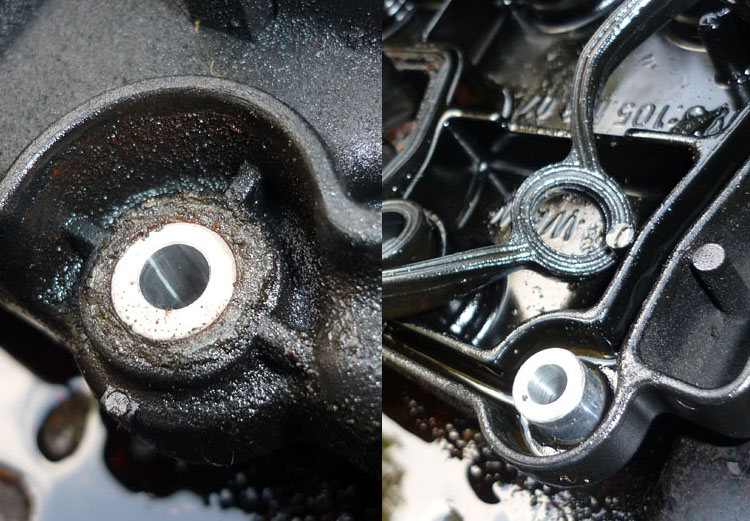
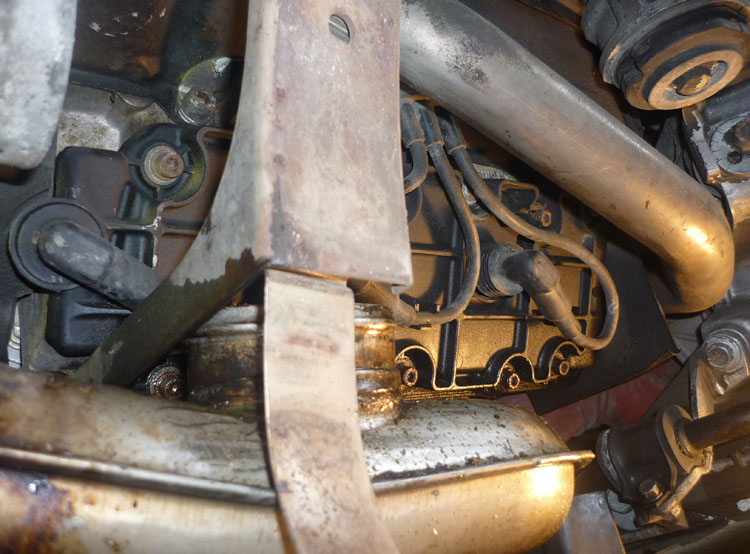
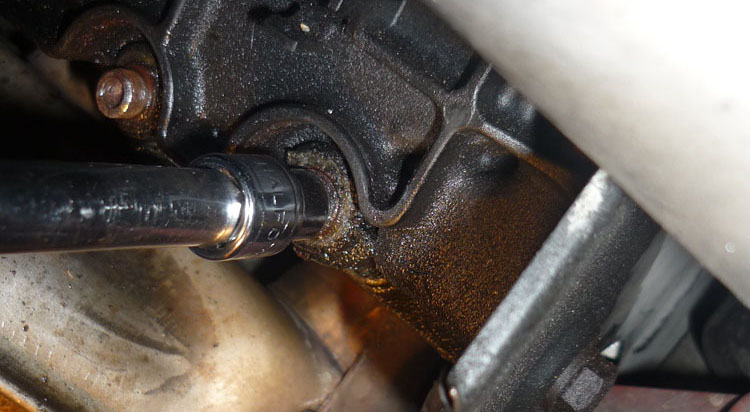
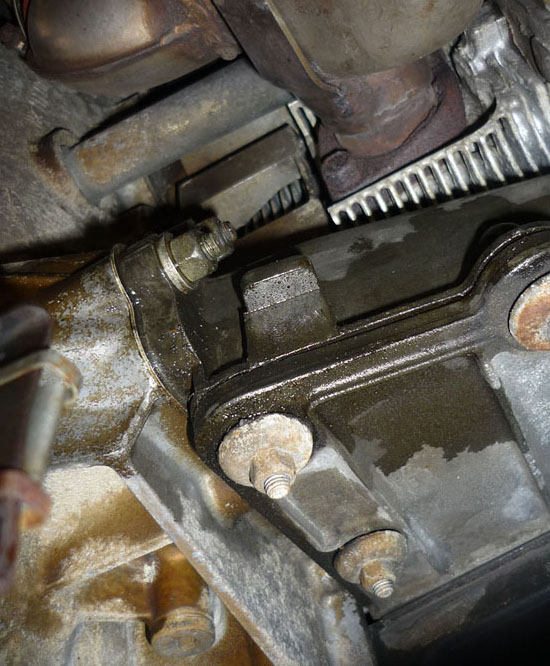
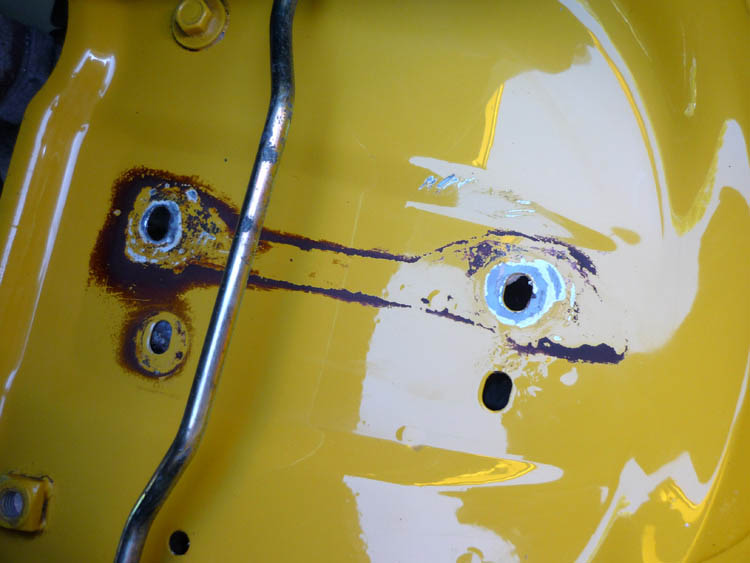
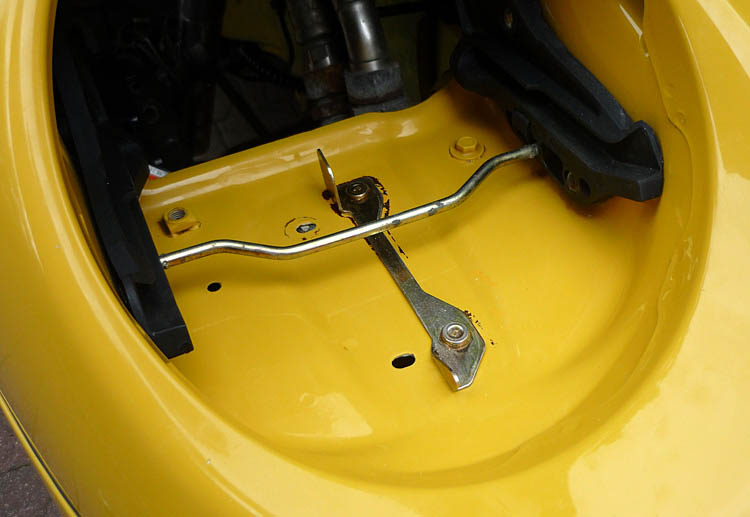
This is the more common area for leaks. This is looking diagonally up at the frontward face of the chain case. Here you can see there is a plastic chain cover and it is secured with nuts on rubber grommets. Again the drill here is to check the tightness of each nut but do not over tighten and do not have variation in tightness (or you are defeating the object of the gasket). The torque setting is just 9nm so a small bike torque wrench is the perfect tool. The next step after this if you have no joy is to simply replace all the grommets. Like the rubber in the valve covers, they can leak the oil and be the culprits. A lot of people report a complete fix after changing the grommets. If this fails then obviously you are into changing the whole gasket and its a bit tricky because the upper bolts is hard to access. I found that after checking all these fixings after a few days the leak had been reduced dramatically. I still have a very small weep at the cover/crankcase join but it's not actually dripping oil. The important lesson here though is the switch to 5w oil. It would seem that many people experience a deluge of leaks when they switch to 0w or 5w and I will be moving to 10w soon and I am told this will help these type of weeps hugely.
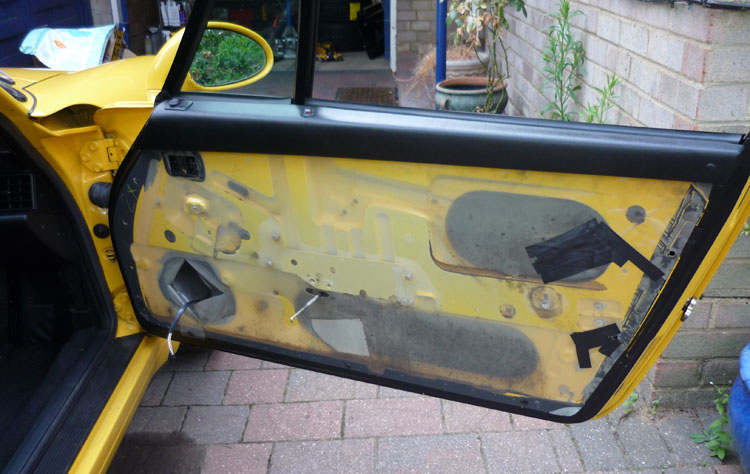
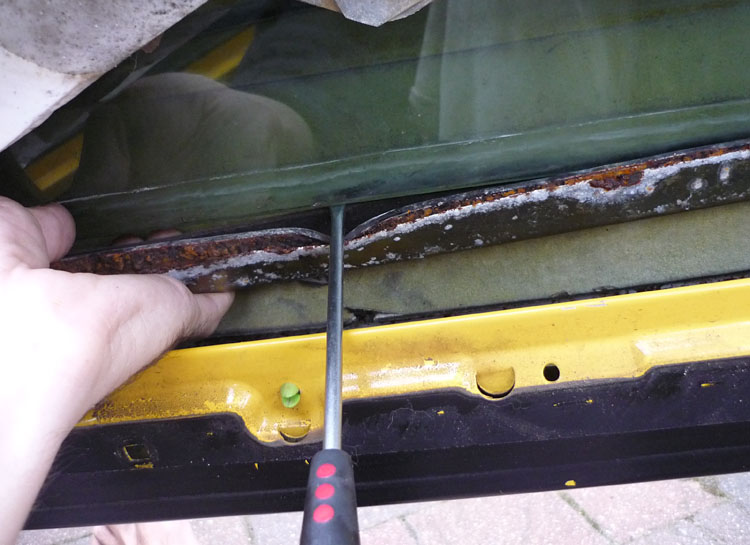
17. Broken Window Lifter August 2009 A lot of activity this month. My 993 had always had a slightly loose driver's side window when fully down. One evening I came back home and it wouldn't wind back up again but the motor would still whirr up and down. A quick peer down between the trim with a torch and I could see some sort of metal lying at the bottom of the door. This is a common 993 problem. What happens is that water gets into the door (sometimes a twisted or incorrectly fitted window scraper/seal is blamed for this) and eventually rusts the window lifter. Very briefly the electric motor rotates a set of metal scissors. At the end of the two scissor arms are 2 plastic pulley wheels and these sit inside the rail of the window lifter arm (allowing lateral movement of the arm). The window lifter arm is the bit that rusts. It consists of the lower piece with a greased channel into which the two plastic pulleys fit and then that piece is joined to an upper piece by 2 metal tabs. The upper piece of the lifter arm is basically a long U shaped channel and the window glass actually sits in this with a rubber gasket in between. Sounds complicated but its very simple and only a ~30 minute job. The first part involves removing the whole of the door card. This has been well described on p-car. Basically disconnect the door lever rod, undo the 5 lower perimeter screws that run around the door pocket (they are hard to see so use touch to locate them). Unscrew the three 5mm allen bolts (2 behind the open lever and one underneath the topmost forward section of the handle. Pull on the door card to pop out the plastic rivets and then carefully disconnect the speaker plug and the electric window switches.
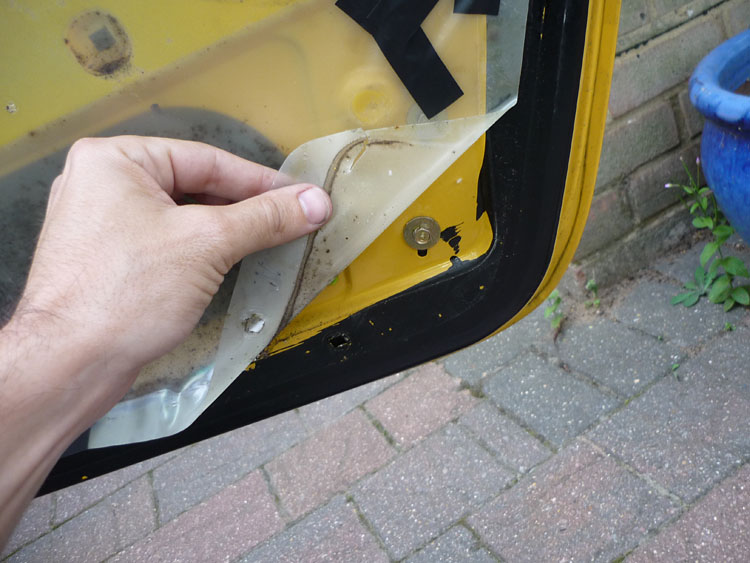
Once the card is off, carefully peel back the plastic 'vapour barrier'. You don't need to remove all of it, just enough to expose the lower and upper lozenge shaped apertures in the door. You may find that it sits behind some of the lower black plastic trim sockets that the door card screws tighten into. I elected to rip these out so that I didn't have to pull and tear the plastic sheeting over them.
WIth access to lower aperture I soon spied my window sitting at the very bottom and also another rusty piece of metal. Prise the window out of the rubber and metal and the remove all the bits. It's a good idea to get the vacuum out at this point as well.
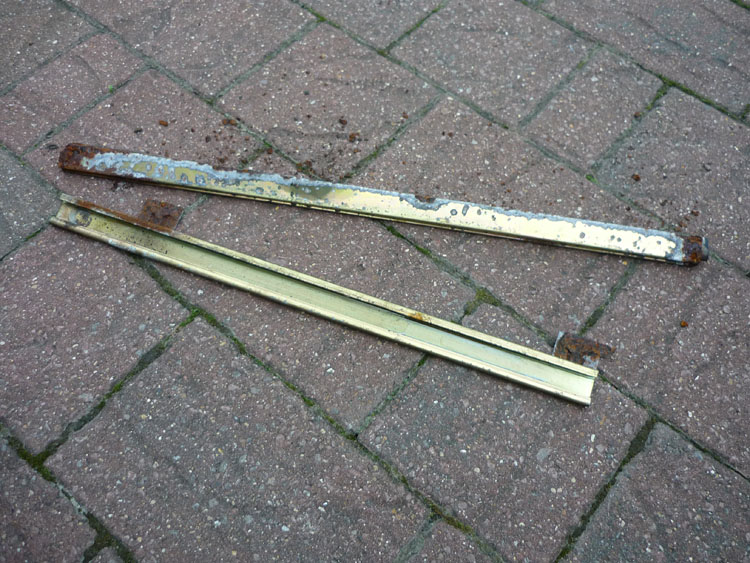
Here you can see what's happened. The window lifter arm has split into two. The two metal tabs that connected it together have rusted through so the piece that the window sits on became disconnected from the piece that slides along the top of the scissor arms. Result = your window falls to the bottom of the door and never comes back.
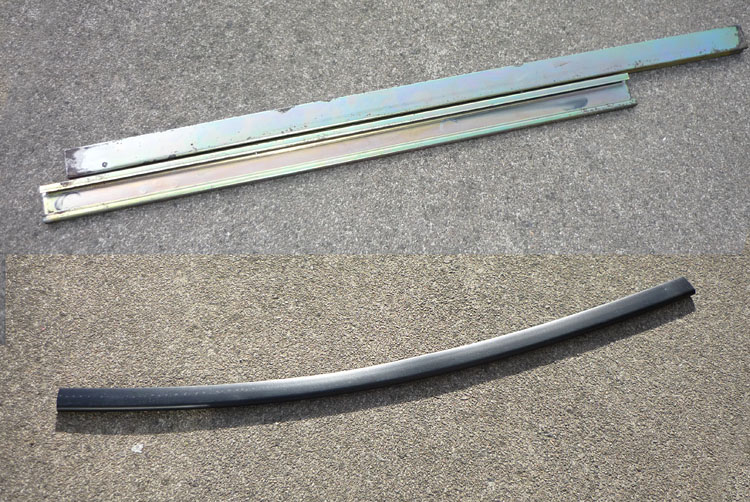
Now there was a big back order in Germany for these so I got one secondhand. At 25 quid it was about a third of the price for a new one. With no rust on it I'm sure it will last many many years, almost as good as a brand new version. You will need a new rubber gasket as well, only about 5 pounds. I also ordered a packet of 4 of those plastic trim fasteners. Also make sure that you get the correct lifter, they are different offside and nearside and also coupe is different from cabriolet. I prepped all this by greasing the channel in the lifter arm and then coating it in waxoyl, paying particular attention to those 2 metal joining tabs. I also put a small bit of glue on the outside of the gasket.
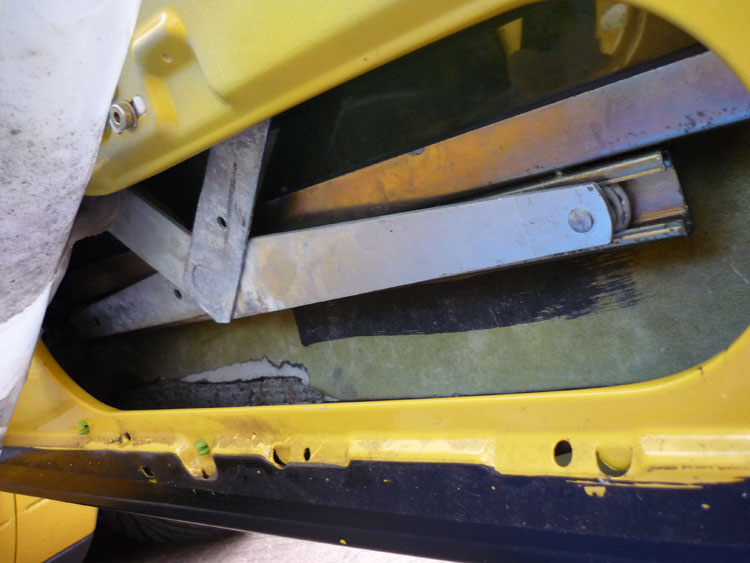
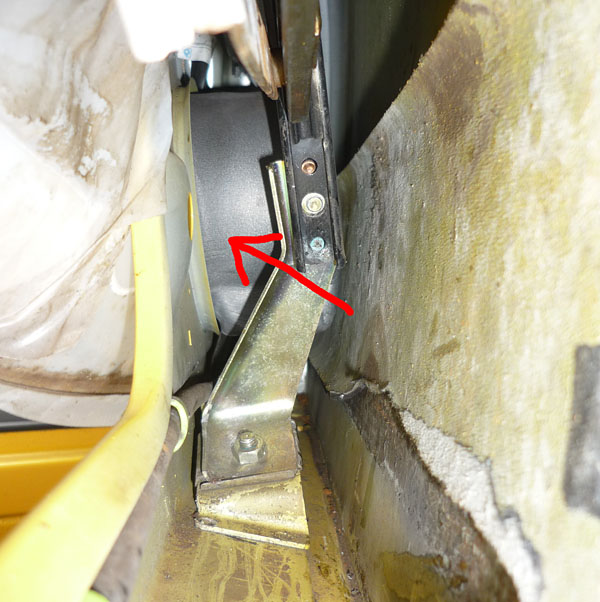
This bit needs a bit of care. First of all get the scossor arrangement out of the way using the leccy windo switch and then raise the glass up with one hand then slide its bottom edge into the new gasket. Position the rubber so it goes almost up to the outer edge of the window. Next, raise the window up out the way completely as you are going to now fit the lifter onto the scissors and then mate the two as a final step. I pulled the window up and then lodged a large object into the upper doorframe aperture so it couldn't drop down again. Now push the electric window switch until the scissor arms are horizontal and level as seen above. This is the position that allows you to get the lifter arm on both pulleys. Slide it into the door and guide the innermost (lefthand if you are looking as per the above picture) end onto the leftmost pulley. Once it has slid on you then need to bend both arm and scissors towards you and the push the arm left towards the car.
You can see in this next picture that the arm can now slide deeper in towards the car if it clears that metal bracket there. By momentarily pushing it where my arrow is pointing you can then get the other end over the other plastic wheel and then slide the whole arm back again.
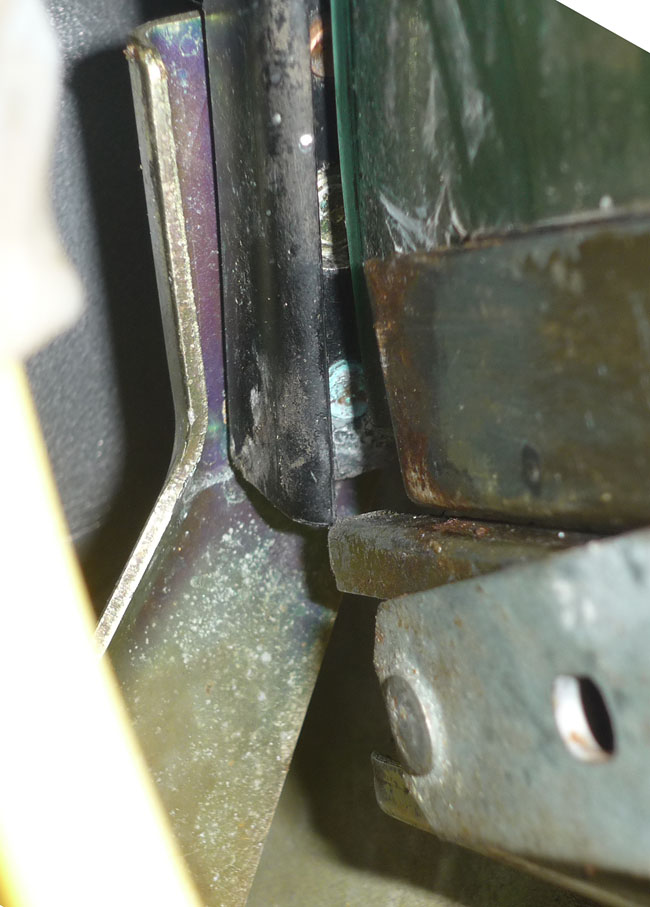
That's pretty much it. Once the arm is sitting on both wheels resist the temptation to start winding the window up and down because the righthand portion can catch a moulding inside the door and it will get completely bent. Keep the arm level at the same vertical position in the picture 2 above and then gently lower the actual glass + gasket with your hand. Slide the gasket + glass into the U channel of the top of the lifter arm (it goes in very easily). The only thing you need to be careful of is sitting it correctly. Look carefully at the picture above. The leftmost edge of the lifter HAS to clear the window glass edge guide that is bolted onto that bracket we were looking at inside the door. You can see that mine is very close, almost too close ! Conversely, if the lifter is slid too far to the right when you mate the glass, then when the window is wound down and up, the leftmost pulley might slip out. So best thing is to get the lifter position so it is touching the glass rail (as in the picture above) then just move it a nats to the right. Once that's done, make sure it all works, Wind the window up fully. The force of the motor will push the glass fully into the arm and if it doesn't quite do it then wind it down a little and finish the rest off with your hands. Now is a good time to get out the 303 protectorant and give the door card and pocket a good clean. Stick back the plastic barrier and screw the door card back on again.
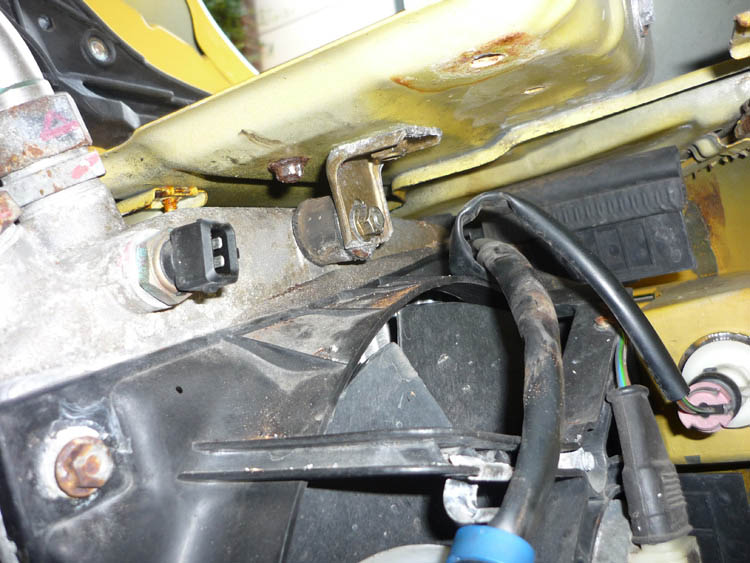
16. Rusty Headlight Guide August 2009 A few months ago when I detailed my car I noticed that behind the offside headlight there was a metal bracket that had completely rusted through. I gather this is quite a common issue. Water can enter in behind the light and sit there in the headlight bucket. Oddly though, this is seen more on the nearside as water in the offside tends to get evaporated away by the oil cooler that sits down below inside the bumper.
The parts to do this come to just a few quid: x1 993 631 063 00 headlight guide Remove the frontmost section of the front offside wheelarch liner. After that its best to remove a few others bits too for access. A clump of wires are stuck to a plastic backing that is secured under the top left nut of the fan (bottom left in the picture) so unscrew this and release it. Also release the horns by undoing the larger 13mm screw that tightens into the captive nut on the headlight bucket and the smaller inner self tapping screw that goes into a clip on the bumper. Unclip the electrical socket that fits onto the headlight (just turn it clockwise), pull out the plug in the end of the oil cooler sender, and you can then pull the horns and the all the gubbins out of the way. You will see that the nuts on my guide were totally rusted through and despite penetrating fluid, hammering sockets on etc.. they would not budge an inch.
I therefore had to attack things from the topside, prising bits of rusted bracket off with a thin screwdriver, mole grips and channel locks and eventually getting the drill out and making holes in the damm thing. It was a nasty job and not one I want to repeat.
After it was removed I cleaned up the whole area to get get to the picture below.
Then I spent about an hour rubbing T cut and polish over the rusty deposits (this isn't rust from the actual bodywork but rust from the original guide that had been pressed down onto the lacquer). I only got so far though. There came a point where the paint was starting to come off too much and really to improve upon this I need to sand and repaint. I'm not amazingly happy with this so will have to revisit very soon. Next I painted the areas around the screw holes and added a few coats of lacquer. When all was dry the next day fixed in the new guide, tightening the new nuts up whilst the headlight was in place. I shall be keeping an eye on this area and trying to establish the cause of water ingress but for the moment, I have completely coated the new guide in waxoyl and also waxed the whole headlight bucket with a generous coating of the very durable FinishKare 1000p.
15. 17" Cup 2 Rims August 2009 My wishbone bushes have been done and the car is back to how it was when I wrote my piece about my first proper drive. You could say that the honeymoon period with the KW is now over and i'm over that initial wow factor. I am now more able to reaccess the car from the more relevant point of view as an almost daily drive road car. I still think there is room for improvement and if truth be told for my purposes I have possibly gone a bit too extreme with the car. I am finding that over undulating roads and over many road imperfections she is exhibiting far too much unwanted behaviour - front wheels deflecting off of bumps, side to side movement under braking still, bumpsteer, skipping & side stepping sometimes mid corner and just a little too much twiddling with the wheel on the straight ahead. Now in a corner the grip and composure and accuracy is quite stunning especially when you consider that its a machine from 1995, but really I want this as a proper road car possibly verging on a 'fast road' car. I don't want the car to drive itself but I'm not prepared to compromise so much that I have to put up with lots of nasties reaching my fingertips or the seat of my pants. After speaking with various people and going out and listening carefully to what the car is doing, my feeling is that a lot of this unsettled behaviour comes from the RS geometry and the increased front camber but that it is compounded by the relatively stuff spring rates of the KW and the low profile rubber on the 18" rims so something has to give. Now there are thousands of 993's with 18" rims out there and indeed, I drove a standard Turbo recently on 18"s and it was composed and compliant as a 7 series BMW so clearly this isn't just a rim size thing. No, its a cumulative effect of low profile rubber, stiff sport suspension and more aggressive geometry (incidentally tyre pressures and bump/rebound settings made little difference). Bear in mind that KW is stiffer and less compliant than the factory RS suspension.
I do intend to try standard geometry with the 18's at some point but an easier experiment was to try the car on smaller 17" rims (exactly what it would have come with as standard). I borrowed a set and found the difference to be absolutely stunning, shifting the car right into a sweet spot as far as my expectations are concerned. The fidgeting, the bucking and skipping and general gnarly nastiness that was present on most roads and encroaching on the driving experience has now been dulled or diminished to such an extent that it no longer dominates proceedings but is a just a vague undercurrent that you can easily choose to ignore. Also the SO2 tyres on the 17's, partly because they have taller sidewalls and probably partly because they are more specialist tyres, feel like they have much bigger slip angles. I am finding that the car feels like it rotates more on entry and you get this lovely sliding feeling ... you adjust your steering a bit to compensate and around you go. They remind me a bit of caterham ACB10's.. having a very progressive feel allowing the car to corner with a lot of yaw. Overall this make the car feel less 'accurate' and 'pointy' than the continentals+18's so you lose out in an accuracy respect, but it's a really satisfyingly slushy 'window' within which to work and so nice when you enter/exit and feel the car pivoting around as you play with the throttle. The best thing of all us that solving everything this way round means I get to keep my RS geometry which is so much better for reducing/eradicating understeer and I also get to keep the adjustable KW suspension which has now had that feeling of tautness just softened a little but still retains its sheer damping speed and ultimate capability. Kind of the best of both worlds you could say.
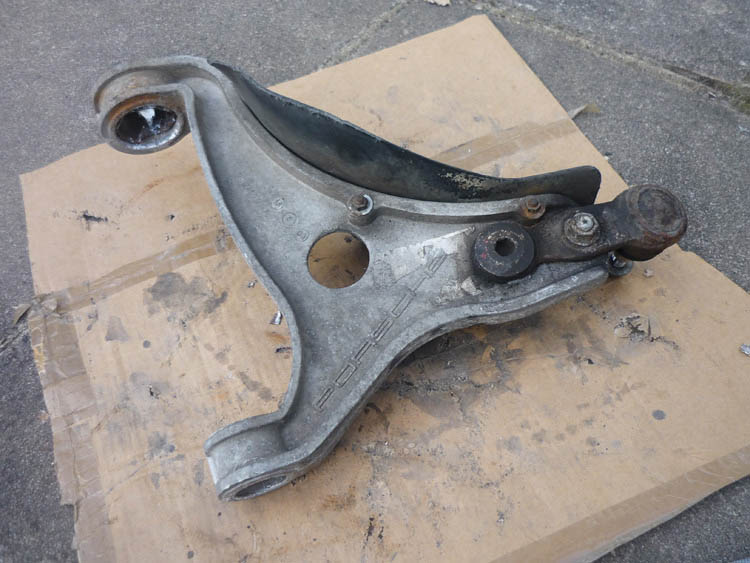
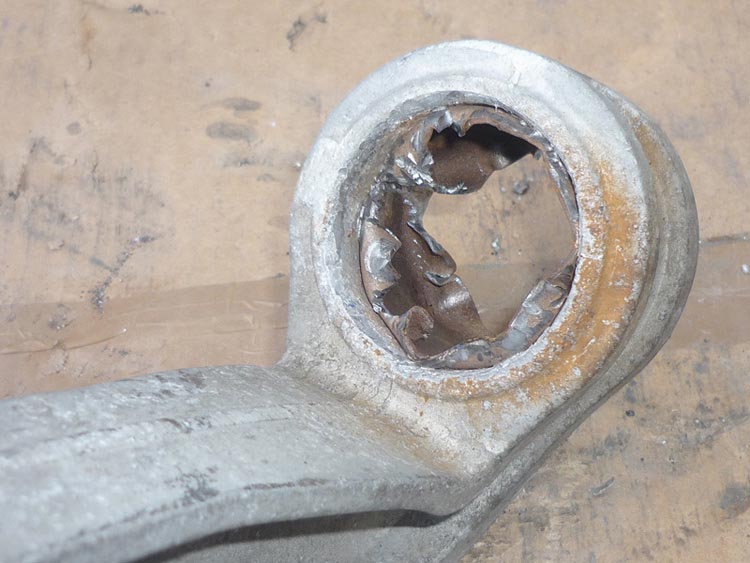
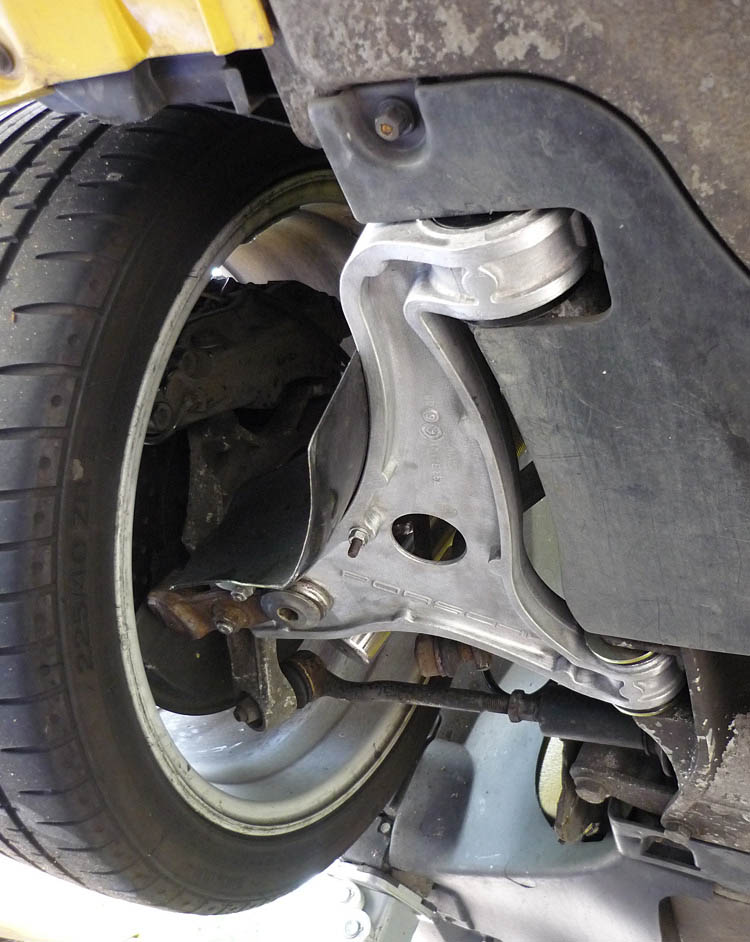
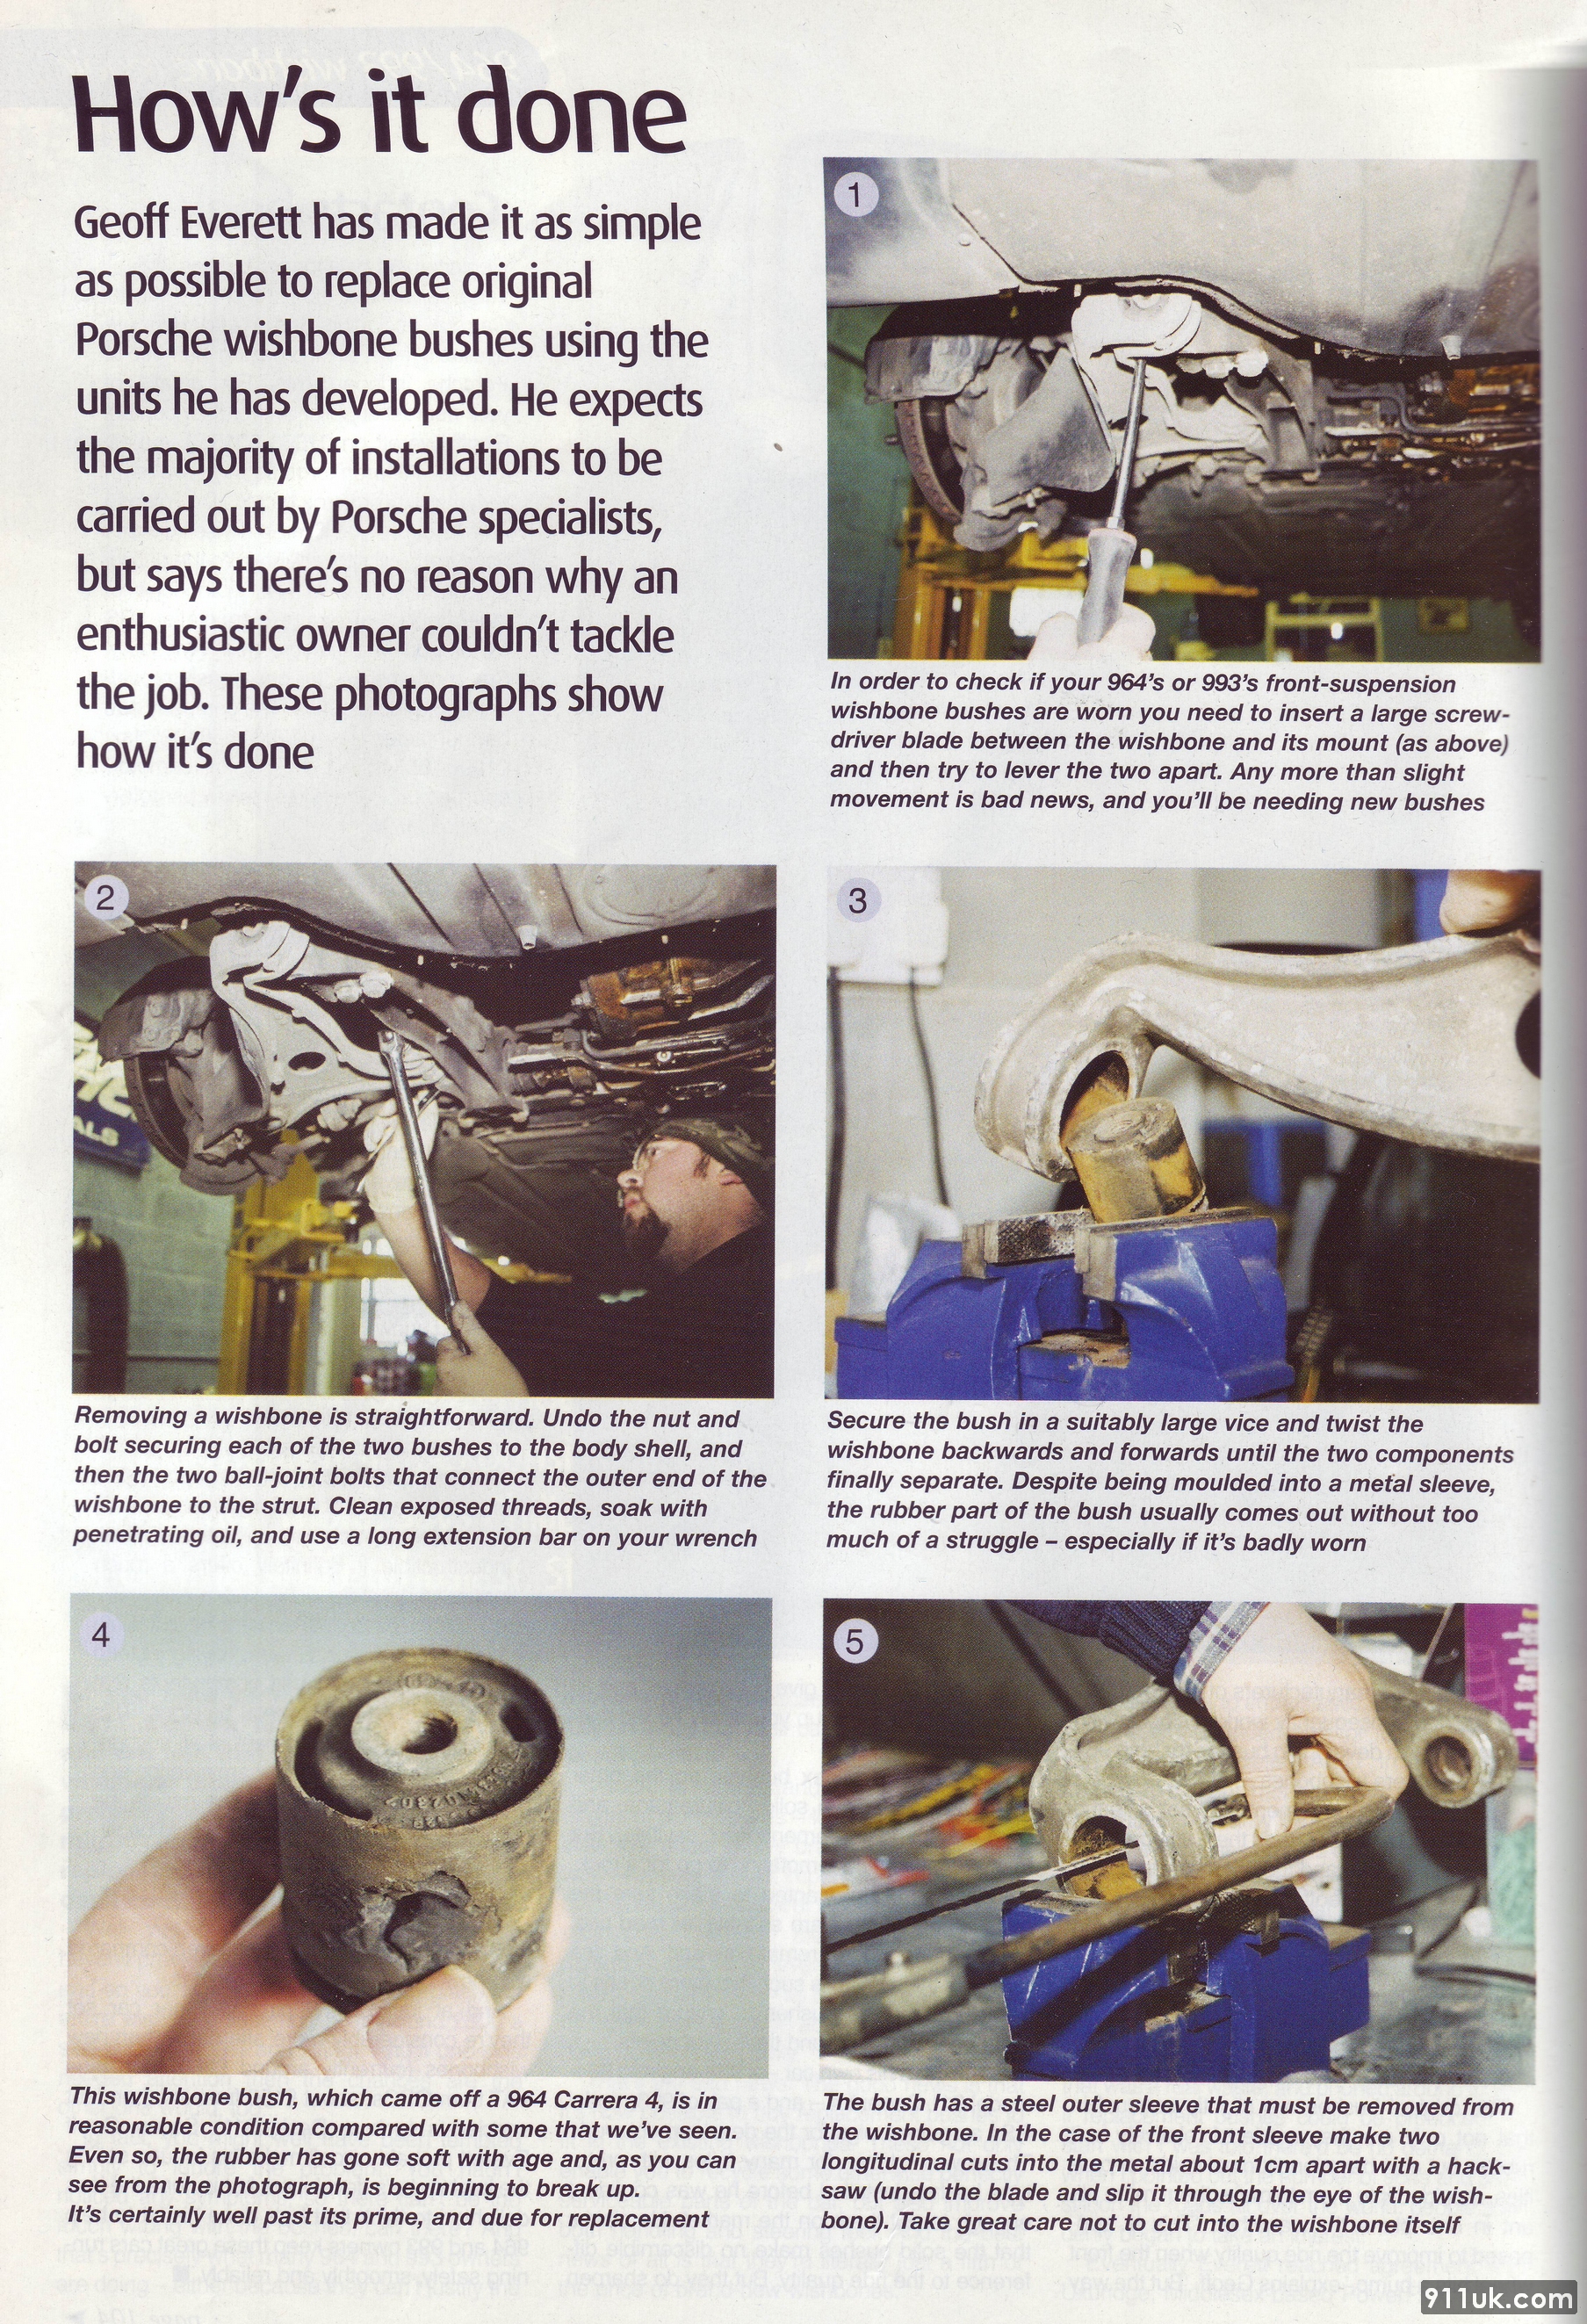
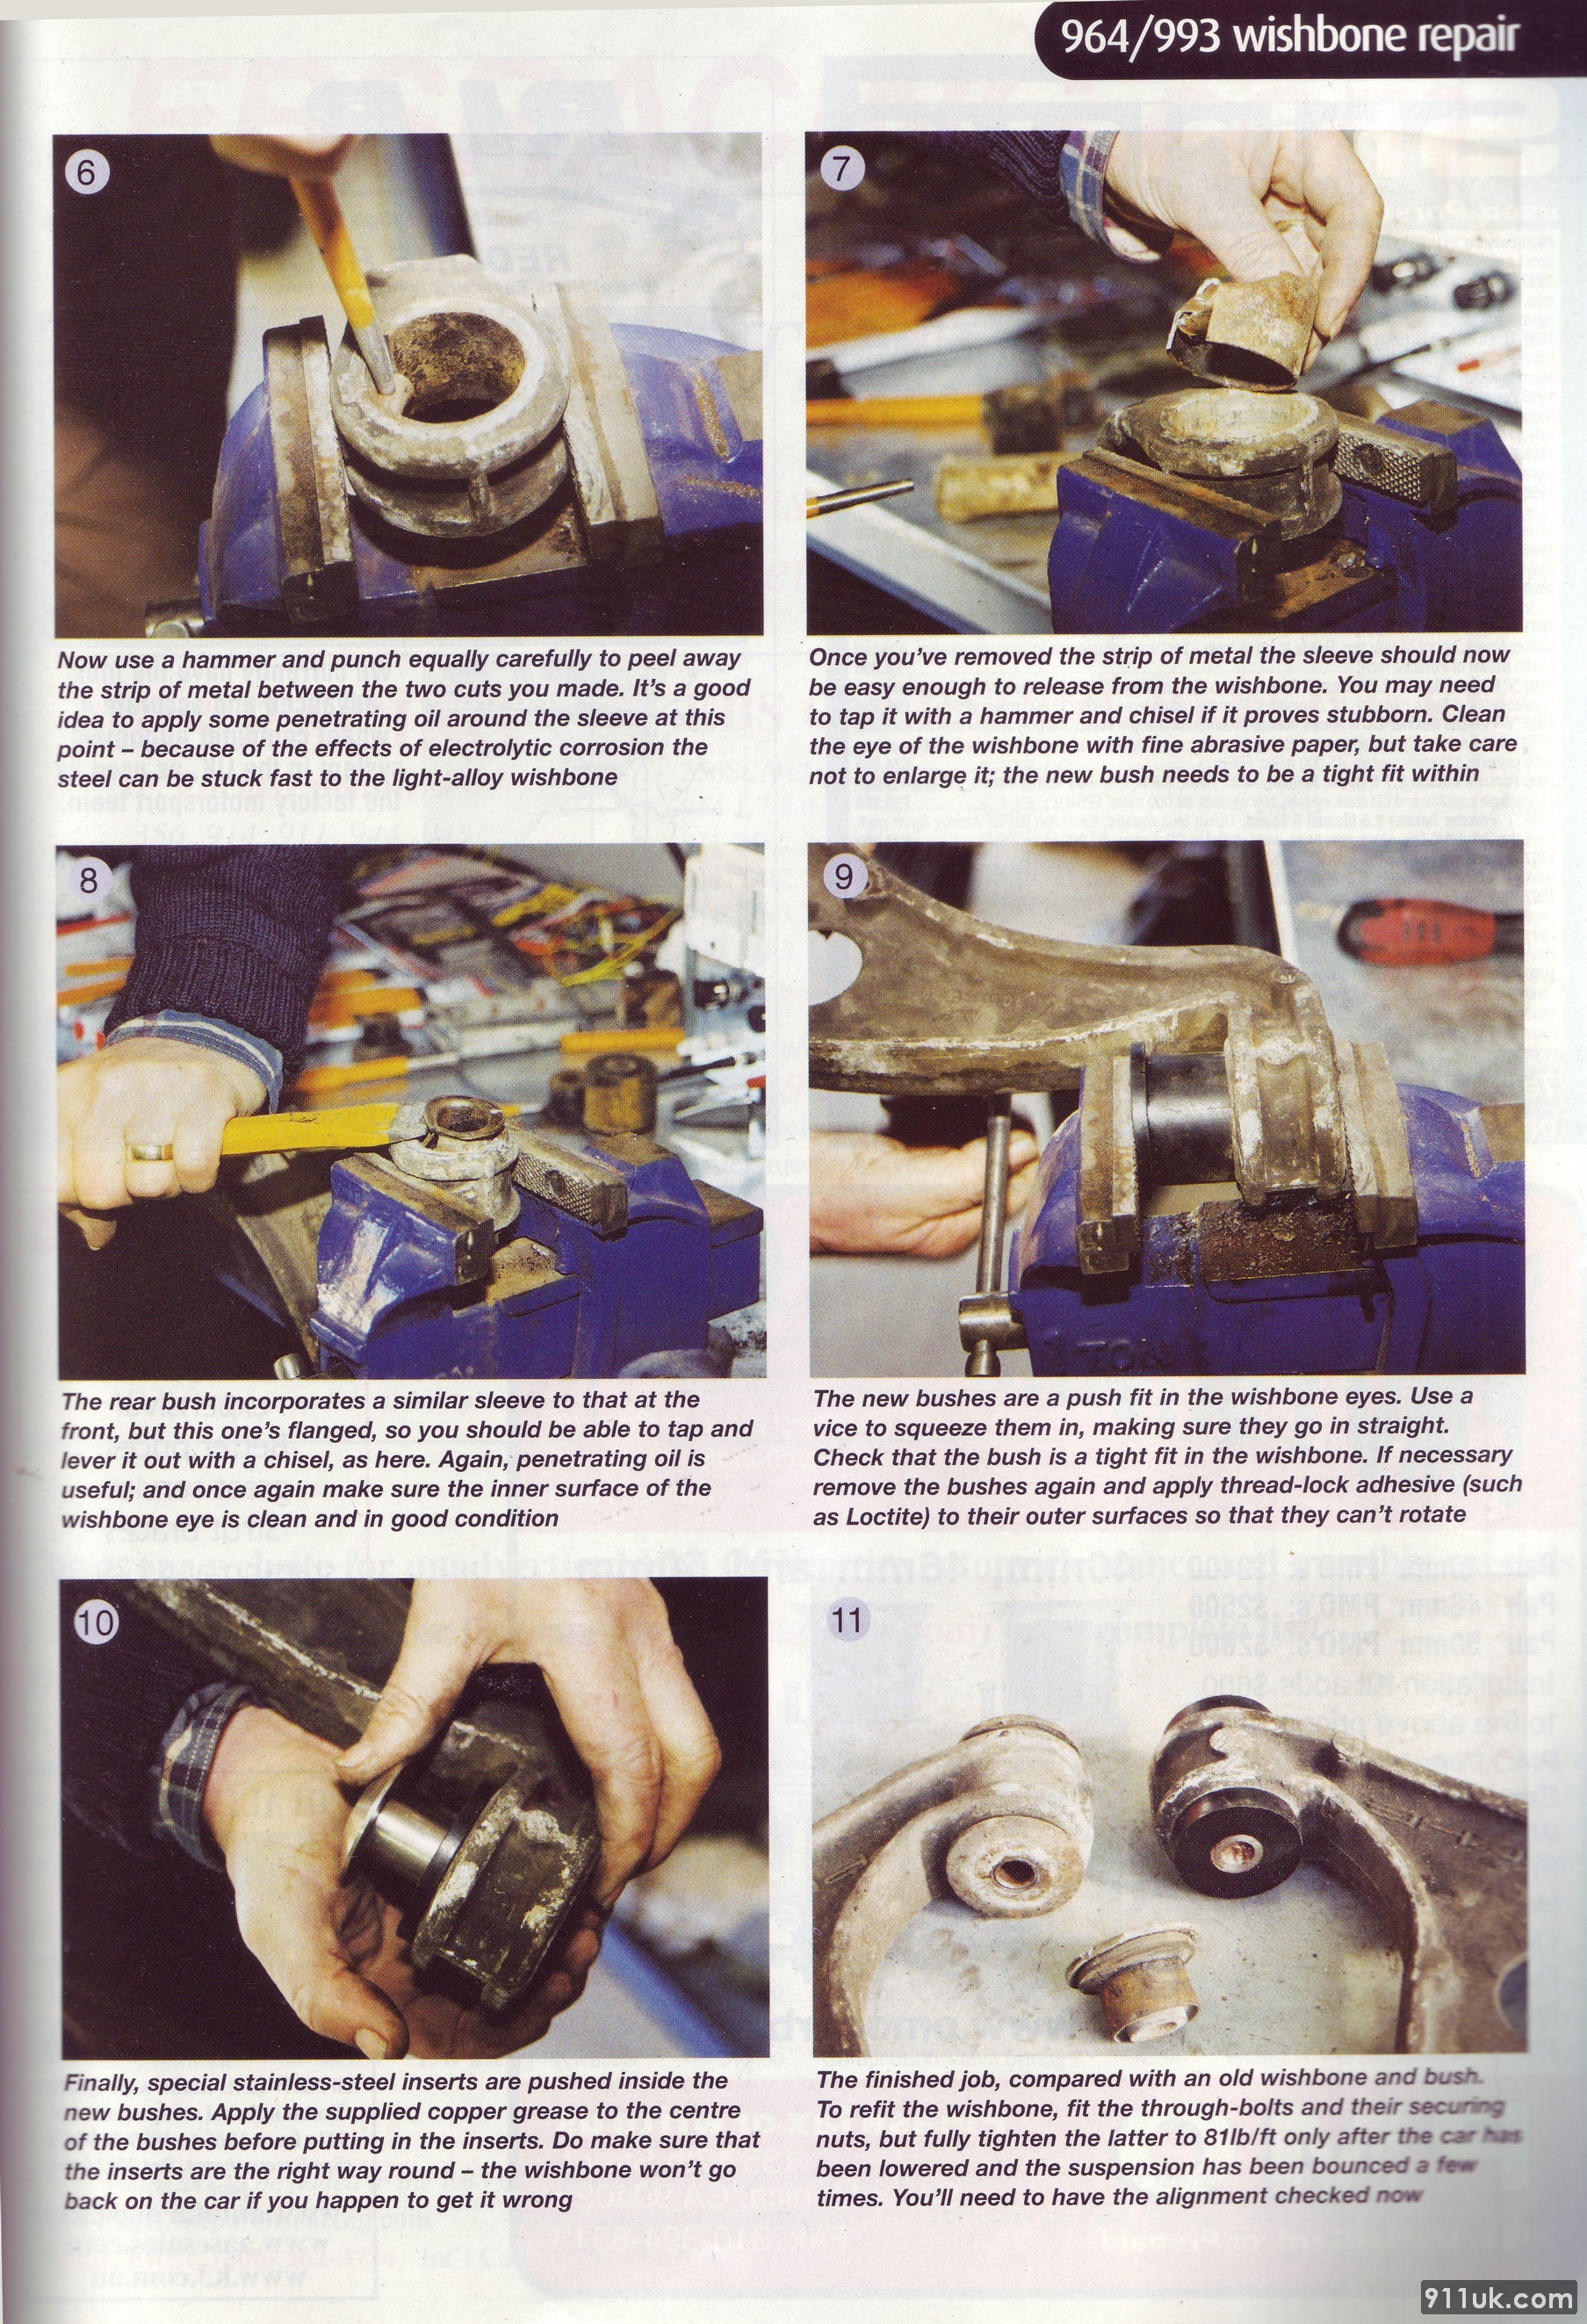
14. Front Wishbone Bushes August 2009 Over the last few weeks I noticed my 993 has become a bit wayward right under my nose, almost imperceptibly but also gradually to the extent where at one point I was scratching my head as to whether it had always felt the same way or not. The symptoms were mainly over undulating roads, more medium frequency surface imperfections (as opposed to sharp or high frequency bumps and lumps). The car seemed to squirm a hell of a lot and it felt like as a front corner compressed down a bump, that corner of the car would get pulled quite dramatically outward. This was experienced mainly at high speed on the motorway and on some sections of road it was truly abysmal and unpleasant, even downright dangerous at time, the whole car weaving and pitching left and right quite violently with a total loss of straight line stability. At first I played around with tyre pressures a fair bit and then the KW bump and rebound settings. But all along the same inherent issue was there, somehow buried deep within the car. Although I had them checked at Tognola and checked them myself when I fitted my KW suspension I decided to take a quick look at my front wishbone bushes again. Sure enough, whilst the offside one was pretty stiff (and with no signs of cracking and not popping out of the wishbone) the nearside one was extremely lose.When I jammed a pry bar between the A arm and subframe i barely had to exert any effort at all and the whole corner of the car swung out. Strange. Maybe these wishbone bushes can suddenly 'go', or maybe jacking a car up onto that wheel can accelerate their wear. You can see a movie of this here. Note that the effort I am having to put on the bar is minimal. I am pulling very lightly and the other side needs a hell of a lot more effort to effect the same sort of movement.
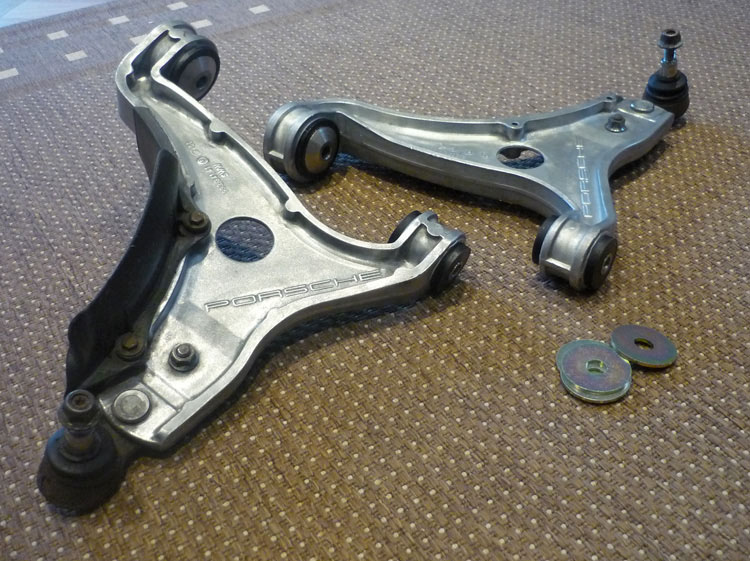
Anyway, the regular fix is to replace the whole wishbone with a new one that has ne bushes fitted but there is a way to fit new bushes into your existing arms. The only problem is that whilst its a hell of a lot cheaper, it's reputed to be a long, tedious and frustrating job to DIY. Still, I decided to give it a go and although powerflex wouldn't normally be my choice, they are a good choice for the 993 as they come with replacement set of inner metal sleeves making fitting a fair bit easier. Also, existing owners on the internet report absolutely little if any detectable increase in NVH after fitting the poly bushes. There is an alternative set you can use made by Chris Walrod on the Rennlist forums. These are softer and for europe are marketed by Gert at Carnewal.com but they don't come with inner sleeves and after the unwanted play I experienced I personally wanted a really solid bush to totally eliminate any looseness from the front of the car for good. I believe elephant racing also make replacement bushes - they are based in the US as well.
I won't describe the job here. Its been covered very well elsewhere, notably in Chris Walrod's guide and also in a recent 911uk magazine article made available here and here
Just a few notes though from me. First of all don't rush into this job or attempt it like it I did without a complete arsenal of tools. I was actually short on sharp hacksaw blades and could have done with a greater variety of chisels as well. It cost me lots of extra time and also the skin off several of my knuckles. Get absolutely everything that you need and then start. Secondly, when I removed my wishbones I detached them at the ball joint so my castor eccentrics remained tight. This means that the geometry will be quite similar but to be honest, the bush change will mean the wishbones are probably seated slightly differently so I will still need to check/tweak the alignment at some point soon.
So what difference did they make and did they cure my motorway stability ills ? Well, the moment I trundled out of the driveway the steering felt sharper, more precise and also a wee bit lighter with slightly less of that initial 'squishyiness' that was there before. Overall, a bit like a layer of mist had been lifted from the steering.
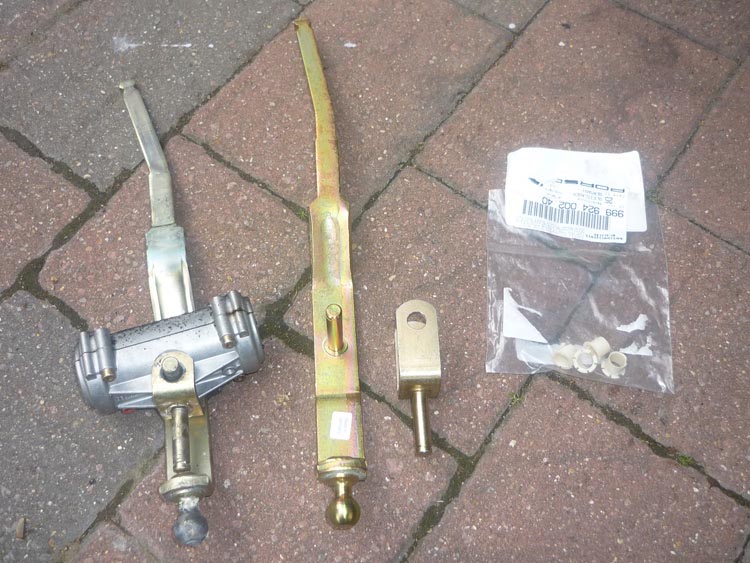
13. RS Shift + shift rod mod May 2009 A very cheap upgrade that makes quite a HUGE difference. Reasonably easy to DIY as well. If you only ever spend 70 quid on your 993 then make sure it's this. Please see separate article here.
12. The first proper drive May 2009 I put off this moment for some time and it's been difficult to bear the anticipation and the waiting. I came home tonight though, bleary eyed and slightly dazed, as if i'd just awoken from some sort of altered reality. The point is I virtually had; it was like finishing a nightlong session of Unreal Tournament. I'd taken my 993 into the depths of Surrey and Sussex, drove it hard, relentlessly across country, barely letting up, covering ground at an astonishing pace. Motorway, carriageway, huge arcing roundabouts, rutted country lanes, off-camber switchbacks snaking through the north downs - we'd done it all together, totally zoned in, focused but flowing to the point where it felt like we were at a strange dreamlike standstill, and the roads were gracefully yet death-defyingly rushing towards us instead of us toward them. With the KW dampers sweetly dialled in and every other suspension component checked and verified, it was time for me to discover for the first time in my life,what the 911 legend is all about. I've driven a number of Porsche's finest in my time but only on short test drives, and we all know that 15 minutes past a village green and down a congested motorway tells you little if anything at all. To be honest, I'm convinced that a part of me was subconsciously expecting to unleash something quite clumsy and disappointing. Rear engined, 1990's, old Porsche, ham fisted ride and handling not developed at Hethel, precarious tail that wags the dog, fidgety, unbalanced, mid-corner bumps leading to 4 foot sideways skips, all the body control of Penny Farthing and so on and so forth. Well, I really couldn't have been further from the truth and all those worrying suspicions were all completely smashed within just the first few miles. instead, I really did return from my outing totally stunned and thrilled at what I'd discovered. Firstly let's just talk about pace. I had this car covering ground at a monumental rate and to be fair I barely even know the thing. We swallowed roads, whole areas, districts, and crossed counties with relentless progress. At least on brand new KW suspension, the 993 is a sharp, razor like tool, so secure and so confidently planted. If you were thinking cumbersome and tractor-esque, then think again because the 993 is more of a driving instrument than you would ever imagine; pointy, precise, a car that lures you in and demands to be driven, to be interacted with and befriended. Central to 993 experience is the 993 feel. Like the 968cs, everything feels very very solid and meaty. The steering, the pedals and box all have considerably more weight to them than modern day performance cars and this really is a blessing (even something like a 996 GT3 is far lighter control wise). There is an immense feeling of solidity in the chassis and suspension as well. It's kind of a heavy weighty feeling but one that imparts security and a feeling of depth and quailty rather than infringing on the car dynamically or subtracting from its nimbleness in any way. As well as the beautiful 'hewn from granite' resistance in the controls there is also this very strong over-riding mechanical, metallic, machine-like quality to your engagement. There is no sanitisation. No control has been sweetly tuned or filtered for ease of use or comfort. Instead, a raw, honest and pure connection to a real mechanical man made entity. It's retro for sure and its arguably crude, visceral and almost agricultural; cars will never feel like this again. But once tasted, it is arguably one of the most infectious and addictive traits of the 993. You very quickly learn that you don't grip the 993's wheel. You lightly caress it with a few fingertips and you allow the wheel to dictate and drive almost as much as you. You learn to steer about a point somewhere significantly behind you and when you have it right, it feels like you are sitting further back than you actually are and all the time the back of the car is pushing the front along. With a very loose light grip the 993 correct itself over bumps, ridges and ruts rather than you. It will stay balanced and planted that way . Supply too much steering input, hold on too tight, unwind the lock too late or too early without listening to the car or over drive the thing and the 993 soon takes on an altogether more sinister and unwieldy demeanour. It won't be plesant and you'll wonder how any 911 could ever be considered to be 'fast'. But untighten from the wheel, listen to the bodyshell, let the car do as much of the steering and correction as you, thread her with minimal inputs, not a millimetre more than she tells you she needs, and she will start to float as fluidly, as surefooted and balanced as you could ever want for. Out on my country roads, I was being realistic with my entry speeds, but certainly fast enough for road driving, and I never once had a problem with the car settling or understeering. She transitions and rolls into a corner in one seamless confidence-inspiring movement, feels effortlessly planted halfway, and the loud pedal can be unleashed midway through with absolute impunity. The rearward weight bias really does give the thing powerful and premature traction on the way out. On some roundabouts I did detect the slightest hint of understeer on exit but nothing that would impact on progress and to be fair, on others, a firm squeeze of the throttle on exit rotated her into an oversteer attitude. At least on dry roads, unless you dive in at some completely bonkers unrealistic speed and then start having to lift and gather the car up again, the 911 rear engined fable doesn't even enter the equation. With the dynamic multilink suspension at the rear the 993 just works. Find some empty space, focus the mind, feel your way through those S bends and listen closely to everything you are being told and before you know it, like many of the greats that i've personally sampled, you are no longer driving a car - it's disappeared, vanished, all that weight has gone and in its place, a vague notion of some type of stiff structure of negligible mass and space resides somewhere underneath you with 4 wheels attached. Ok, so you don't experience that final 'elise-esque' phenomenon where it feels like your very palms are welded to the cars steering uprights, but as tin tops go, this is one very unencumbered and connected machine. We are only halfway through the story here though. Of course we're in 911 land now and the drivetrain is the other 50% of the experience. The incredible noise with the sports exhausts dominates proceedings and massively augments any thrill that you might feel through your backside or your arms. This and the car's iconic retro looks means that she exudes so much character and even trundling through the local village at 15mph, bouncing that beautiful metallic gurgle off of stone walls and shop windows is a totally engaging experience. Fun doing the shopping, fun driving it hard. Of couse with less than 300 bhp she isn't mindbendingly quick but use that amazing traction, throw in a few quick gearchanges and take it nicely to the redine and don't be suprised if you can stay with something like an Audi R8 through 2nd, 3rd and half of 4th (It surpsied me !). There are obviously far faster cars out there, but for the road the straight line speed is easily enough and more importantly, in context you don't find yourself wanting more. When she hits the variocam in 4th that's the highpoint. You get an extra rush there and you are starting to hit big numbers and the big speeds she carries off just so well. Its very evident that these things were built for real speed. The brakes also deserve special mention. Their power is mighty. I had to use them in anger on more than one occasion and such is their outright stopping power that they did not once threaten to let me down. Like the 968 M030 brakes, they also give off this wonderful confidence at high speed. Brush them lightly and even if you don't intend to drop that much mph, they just feel so solid, powerful and reassuring. These two cars are the only ones that have ever provided me with that sensation. Apart from another 911, I don't think there is a single car out there that can inform you about the 993. This is a car that's evolved from something totally imperfect. Perfection, correctness, 'state of the art' have been exchanged for character, engagement, vigour and aliveness. It seems to do many things differently to all other cars. The 'colourful' ride/handling and chassis, the heavy control weights, the rear engine dynamics, the pattering of the front end, the flat 6 engine, that delicious downward curved shape of the back end, that ridiculously upright dashboard and windscreen... It's this deviation from the ideal, this idiosyncrasy and uniqueness that forms the basis for the car's gigantic sense of character. You will totally fall for it or hate it with a passion. I completely understand why people get to 911's and then go on to own whole lists of them year after year, decade after decade. It hasn't been very long for me but already I totally get that.
11. KW Testing, Part 2 May 2009 I was suffering from a cold when i came back from having my geo done and was very tired as well. But now I've had some time to give the car a bit of a work out and lean on it a little. What's immediately apparent now that the angles have been balanced at all corners is that the 1 degree camber up front does introduce some instability over bumps. The harder the suspension the more pronounced this is and the more it will affect the actual car, right up to the point where it is actually pitching and shifting across the road. Now this is what I want to avoid and it's particularly crucial to get this solved because on larger 18" rims its obviously more pronounced as there isn't a nice big soft sidewall there to soak up and perform a lot of the suspensions job. I am a great believer in the idea that suspension starts with tyres and the lower profile the rubber you have, the more difficult you make life. With my geo now sorted I think my mind went into a different mode where I started to become a bit more picky and demanding whereas before I was just making a general note to myself of how everything was working. I also have driven a few normal cars in between and when coming back to the 993 I realised that maybe I was getting a bit too used to it, as taken objectively, it really was actually quite a harsh ride. I have also started to focus more on high speed driving and going out on a little test route has exposed some problem areas. REBOUND: front, 10 clicks open, rear, 10 clicks open With the settings as they were before (see above) I found that the car was exhibiting too much instability over bumps at higher speed. Near to me is a short section of the M3 which is extremely bumpy. It has very sharp ridges running its width which really jar the car as it runs over them but then also lots of larger frequency dips and swellings which really push and pull and make everything feel a bit wayward and almost dangerous. The wind there is also pretty strong and was tending to pull the car around way too much as well. This is quite possibly the worst section of road the car has ever been on and certainly, I can't recall things ever feeling so bad so i've nominated it as a major part of my test route. My first experiment was to soften the bump up: REBOUND: front, 10 clicks open, rear, 10 clicks open I found that this immediately helped and took some of the sharpness away. When you go over high frequency bumps its not so jarring anymore. It's still very taut and firm but not crashy and unpleasant. However, back on my stretch of Motorway the car was still unstable and into tighter corners, especially under power it feels a bit 'over-taut'. This is a feeling like the car wants to flex on its suspension but can't so you end up with a sort of uncomfortable taut stretching feeling that lacks fluidity and natural balance. The body almost feels snappy if that makes sense. To try and combat this I unwound the rebound some more: REBOUND: front, 13 clicks open, rear, 12 clicks open Now I am kind of contradicting myself here because earlier on I found that 12 clicks on the rebound made the car feel too floaty and unstable. Well I can only say that things may be different now that the geo is done with more stability inherent in the car but then also, when I first fiddled with my KW settings I had been used to driving around on the default KW suggestions which were bonkers hard. Maybe the lesson from this is to get your suspension right but then also have a second evaluation that matures over a longer period of time. With the extra rebound at 13, 12 I immediately noticed another improvement. The car no longer felt that unstable like it did last time but more tied down at speed. Back on the M3 although I could feel the bumps trying to unsettle and shift the car from side to side, somehow the effect was minimised. There I am still twiddling the steering wheel by microscopic, almost autonomic amounts to keep her nice and straight and balanced but there is a cosseting going on; the extra rebound softness is like a bit more of a buffer between those bumps and the bodyshell and cockpit and hence you. It almost feels like if you could grab the 4 wheels with your bare hands and then move them all around a bit in circles, there would be a nice bit of play there and the body could remain perfectly still. I was getting the same feeling powering into roundabouts and tighter bends. As you turn in or power out, you sense the body rotating ever so slightly on the suspension. There is some rotational play there, a degree of looseness (although perceived as 'rotational' I suspect it's more conventional body roll) and not only does it impart a huge sense of security but it introduces some give, some breathing space and some room for a wider range of acceptable steering and throttle inputs. I think if you watch a point of your car through the window relative to the road you can actually see it as well, or at least you imagine it. Everything is slightly more forgiving and more importantly, the process of cornering is now starting to have a flexible fluidity to it, an organic malleable quality to it which i just love. Off one of my big roundabouts there is a long uphill stretch that is great to accelerate up. It begins with a left hander and then gets quite bumpy in places for half a mile or so. Beforehand I found I was tentative in applying full throttle out of the first bend and then accelerating and changing up through the gears, the car was wanting to shift left and right which made the whole acceleration process a bit unenjoyable. On the new softer rebound settings I had much more confidence to plant the throttle and again, those side to side movements felt diminished and dampened, like the body was now on a cushion of air just thick enough to isolate you from those rough movements. Accelerating up that hill became really satisfying and I felt like I could just concentrate on my redline and savour some nice quick upchanges with a pleasing feeling of total stability. Overall very promising then and I am stunned at just how much difference can be made with tiny adjustments. It just goes to show that the sweet spot for any given driver might actually be hard to find and quite elusive unless you really do lots of testing. A quick word about lower speed driving. Trundling round villages and towns the ride is fine and stability doesn't really come into it. In fact I was reasonably happy with this on the older firmer settings. So far my tests have basically been about making the car progressively more softer from the default KW settings given in the manual. I think from here I need to take the settings to the extreme of softness until I hit the point on both rebound and bump where performance, sharpness, feel and ability becomes too compromised. NOTE: for all testing above the pressures were set to 36,39 to minimise any harshness due to high tyre inflation.
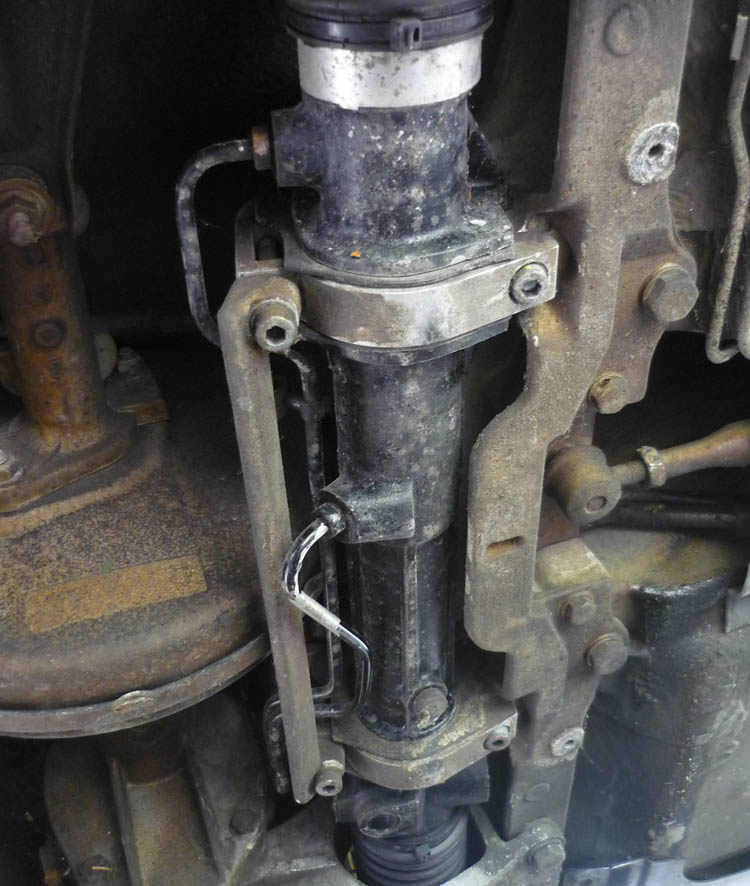
10. Presence of Steering Rack Brace for 18" rims May 2009 993s that run 18" rims should run an strengthening extra brace that is bolted to the rack to cope with the extra stresses. I thought it wise to check that this had been fitted to my car. Remove the steering undertray with a handful of trim fastners and 2 bolt head screws and take a look. Here you can see mine has been done in the correct way with the brace running left to right across the rack.
After a full KW install and suspension checkover I had my geometry done today at Tognola Engineering who use a very nice Beissbarth system with hub attachments (same as OPC use). You can read more about their alignment services here. For the ultimate in setup and corner weighting Chris at Centre of Gravity in Warwickshire is known to be just about the best there is. he has a reputation as a complete perfectionist and it will be an 8+ hour day for you if you take your car there. He also has a a fair bit of knowledge with regard to setting your car up outside of factory settings and getting it to do exactly what you want it to do. Added to that he can also fit suspension (including KW) and will offer a free geo recheck once its dropped and settled a bit. You do of course pay for 8 hours labour at around 60-70 ph but then he is recognised as one of the best places to go. I have also heard very good things about Fearnsport who are based at Silverstone. I decided to go to Tognola as I didn't need the absolute last word in geo and didn't want corner weighting. I just wanted a base setting to get used to and run the car for 6 months to see how I get on before getting too pernickerty. I have yet to get used to the car and am not yet in a position to discern exactly how I want everything and besides, as the new KW's set, it will all need tweaking again in any case. Tognola have good equipment, have done geo on tons of cars, prices are pretty cheap, they have good experience with running RS cars and it's local. They also have the Kinematic toe guages which many indy's don't have (as they are so expensive) and whilst the Kinematic toe isn't necessarily essential (it shouldn't change so only really needs to be done if you completely strip the suspension) I definitely wanted it checked on my car for peace of mind.
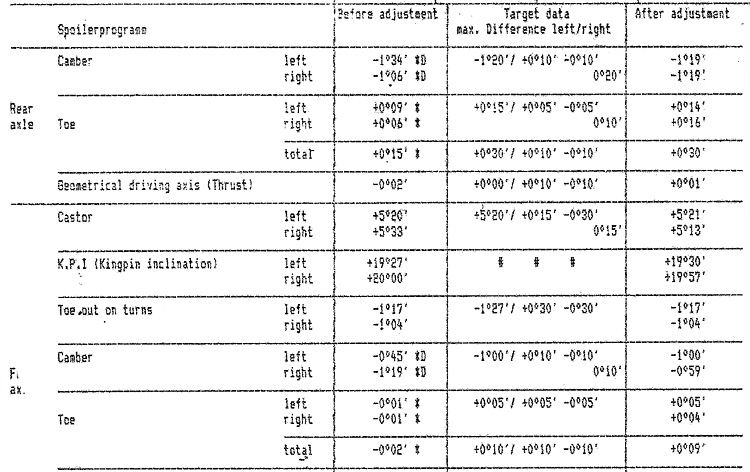
First off they checked the ride heights which were nice and equal both sides and then also checked the rake with a spiirt level on the sill of the car and this also was spot on with a slight nose down attitude. My actual geo settings weren't too off to start but here is the before and after. Tognola gave me a base RS setting. Even these small angle changes transformed the car quite radically. On the way home she definitely felt is if the four corners were no longer fighting eachother and there didn't seem to be as much weaving and instability in corners. I can't comment on ultimate grip levels and cornering attitude and character yet but from a ride and body control point of view everything seems to be working well. I am sure more KW tweaking will take it a stage further as I am only on a rough setting at present (see below).
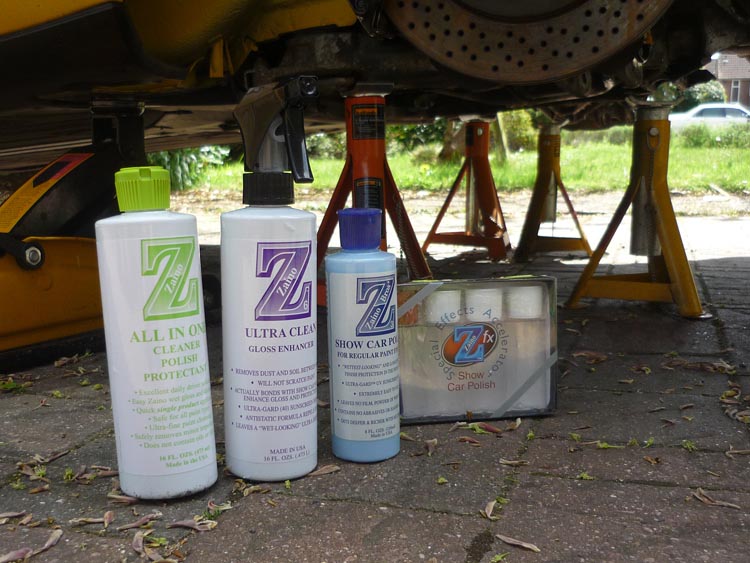
8. ZAINO Protection Detail May 2009 A big clean up and protection treatment. A biggie this one with tons of pictures so see separate article here.
I've been fiddling with the bump and rebound on the KW a little. I'll know more once I get her to an airfield and can get take to some good fast roads one weekend but for now I am just interested in dialing it into the realms of acceptable and pleasurable ride quality and compliance. All measurements are made from "fully hard" also described as "fully closed". As you look down the damper at either end you would close or make it fully hard by turning in a clockwise direction (just bear in mind that for bump, with the struts on the car you would be upside down to look down the damper so with the strut position normally, clockwise seems like anticlockwise for the bump). In the instructions, KW recommend a 'default' setting of: REBOUND: front, 8 clicks open, rear, 8 clicks open Now I found these settings very hard. The bump is extremely hard, the nose is unsettled and skittish, the front tyres weaved over unsmooth tarmac and the turn in had an unpleasant flat and rigid feel to it as if the tyres had zero profile. Always best to play around with one thing at a time. The first change I tested was to set the rebound 4 more clicks open or softer to: REBOUND: front, 12 clicks open, rear, 12 clicks open The difference here was very apparent. Although the harshness in the bump was still there, the car settled a lot softer and generally had a better ride quality. At higher speed it started to feel a bit floaty though and the bodyshell felt like it was swaying a bit too much independently of the suspension. In other words, too much roll and wayward movement which is particularly irksome at high speed. The next thing I tried was to set the rebound back to a compromise of 10 clicks open. Then I dramatically changed the bump to 1.25 turns open at the front and 1.25 turns open at the rear: REBOUND: front, 10 clicks open, rear, 10 clicks open This was another huge improvement toward a good setting for UK roads. The harshness in the high frequency and sharp bumps immediately disappeared and also the steering suddenly had a much sweeter turn-in: less pointy for sure and not as precise or immediate but a rounder softer feel that is far better for a road car and feels naturaland unperturbed when turning over bumpy surfaces. The nose no longer gets pushed and pulled around by undulations and the car is generally a lot more composed and stable. Body control is also starting to come into its own, round some of the local roads here the KW's started to feel like they were doing their job and the body on top was being kept nice and stable and balanced regardless. Quite surprising, at times she felt almost lotus-like. For the moment I am very pleased. This setting needs more exploration and obvious tweaking when I start getting into limit behaviour but generally, the car feels like a modern car now.... planted, firm, composed, yet unobtrusive and you tend to forget about the suspension and just let it get on with its job. It's really quite amazing and to be honest totally trashes all my expectations (or rather fears) about what these older 911's drive like. Incidentally, the boys from Tognola said that a stock 993 RS feels more compliant that the KW's at these settings. I'm actually quite surprised at that. On bumpy roads my car is now quite firm but I wouldn't call it overkill and on faster, smoother roads you really start not to notice the suspension. Maybe the RS is quite soft in default form but this is counteracted by the myriad of harder bushes and a stiffer overall structural feel. More testing required once my geometry is done.
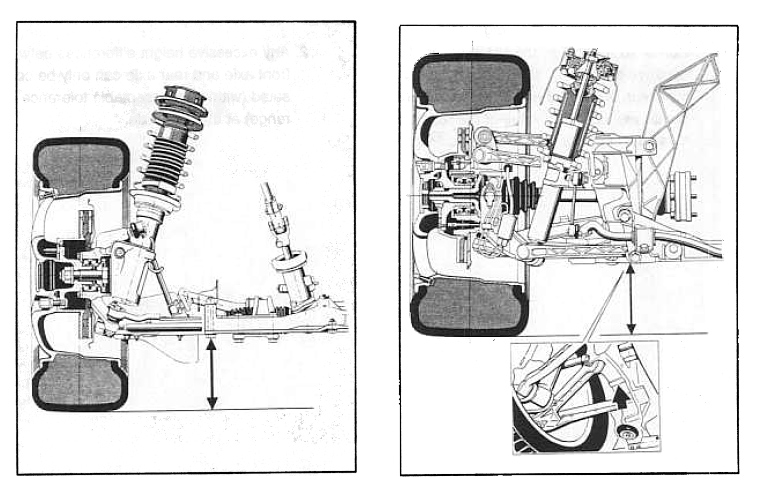
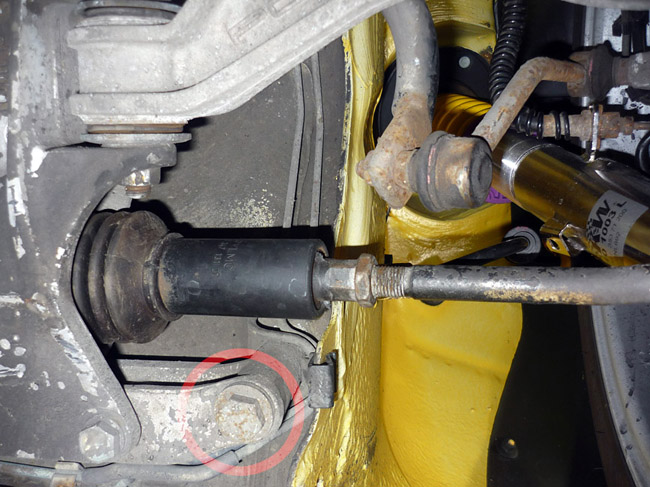
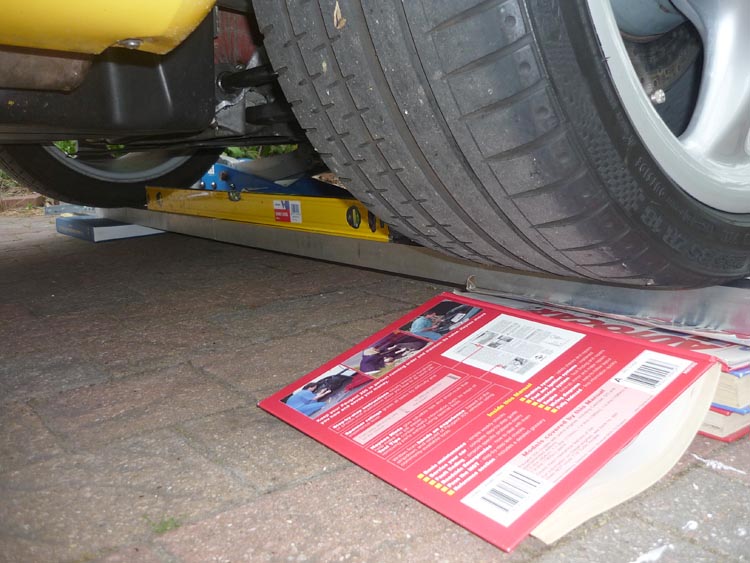
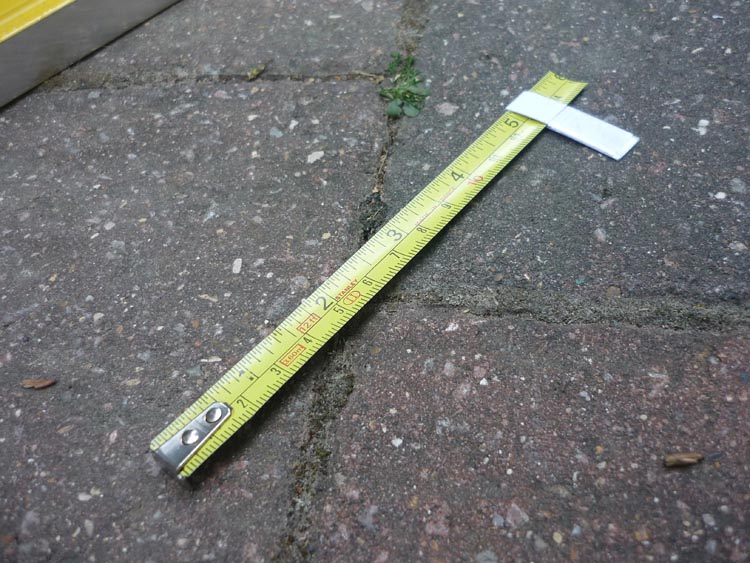
PLEASE NOTE that since I did the ride height and wrote the following, I reliased that the KW should really be operating round RS ride height so bear his in mind. Kw are not designed to run the car at Sport height and you will have too much preload on the springs if the platforms are too high. I didn't want to properly corner weight the car this time. The supension will settle as its new, initially I just want to get used to the car and discover it and besides, i'm of the opinion that general fast road driving sans trackdays just doesn't really warrant corner weighting on a heavy car like a 911. To set my heights I used the measuremnet points in the workshop manual. The outer bolt face that is just forward of the tie rod and front wishbone, and then for the rear the rearmost flat mating face on the underside of the subframe. I used standard sport heights which are front 144mm, rear 127mm. I filled the car up with half a tank, set the pressures to dafult and then to get the car roughly level on my wonky driveway I set books up under the car then ran a big metal bar of box section aluminium between the tow wheel and allowed the car to settle on that. Not only did I measure from the surface of this but I also obviously put a spirit level onto it to ensure it was level. I also made a little heath robinson measuring device from an old tape measure and a stick of card whch helped enourmously.
front ride height point .. measure up to the faceof this bolt head. The rear point is more obvious, a lateral machined flat on the bottom of the rear suspension side section that is in line with the centre of the rear A arm/wisbone.
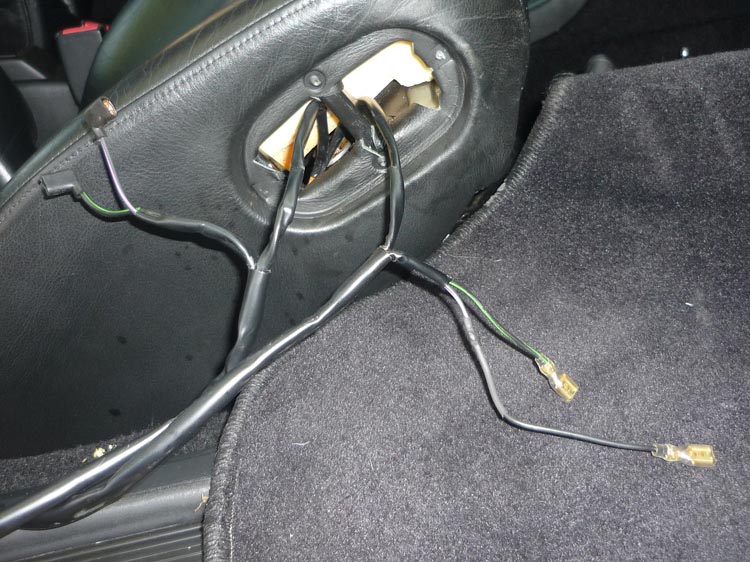
5. BROKEN SEAT SWITCH May 2009 A common one this one. My forward most up/down electric seat button wasn't working when I bought my car. Now this could be a faulty motor but it is more likely to be the switch or the wiring. If it's the switch then by opening it up and spraying with contact cleaner (get that from Maplins) all could be saved. Alternatively a new switch might be needed from OPC. When I had a poke around under my seat though, some bare wires caught my eye. On closer inspection it appeared that two wires that originated from the seat switch were damaged; one had a spade on the end but was unconnected and the other looked like it had been severed and was hanging free (severed by the seat being moved forward and back no doubt). I also noticed that the inboard motor had no wires on its two terminals... bingo. An easy fix but I had to take the seat out to make access easier. That in itself is simple enough, just undo the 6 hex head screws in the seat runners (to twist those bolts back in quickly by hand be sure to use a long extender bar with a flexible attachment on the end and then the socket). With the seat up I was then able to pull the broken wires back up through the seat switch hole (after removing and cable ties), solder on some new wire, heatshrink the joins, then solder and crimp on a new spade connector on both wires and then put everything back together attaching the two wires back to the motor (be sure to cable tie everything neatly again to the roof of the seat so that free hanging wire cannot get sheared in the future)
4. KW variant 3 Install + Full Suspension Checkover May 2009 A huge suspesnion article this. Getting the car handling and riding as new. Checking over all my suspension components, bushes and ball joints and then fitting new KW variant 3. See separate article here.
When I got the car one of the rear indicators was very old and tired looking as was the rear centre fog light. With age they get covered in hundreds of tiny potholes which makes them look old, faded and misty. So I fitted a new centre fog light (not cheap !) and then instead of buying two new rear indicators it was actually slightly cheaper to buy the official Porsche 'light kit' consisting of the two rear red/red indicators and the two front clear indicators as well. I also ebayed my existing clear front indicators which were in good condition and I ebayed all the rear lights (yes, even if they are cracked and faded people out there still want them). This brought the cost down from 535 to just 366.
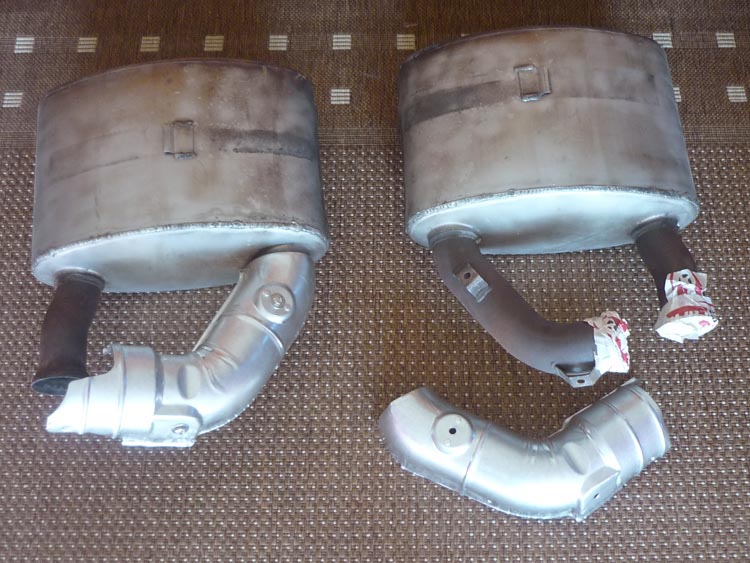
The stock 993 exhaust system is pretty poor for sound. There are the most incredible noises inside that rump and they need to be unleashed. There are various options here including lesser known offerings from Cargraphic. Milltek and Hayward and Scott, but the most popular options are RSR's, Fabspeed and/or sports cats. RSR's (no connection to the Porsche RSR) are made by a Belgium chap called gert. On an exchange basis he will sell you a pair of his rear silencers that are standard ones that he has cut into, modified then welded back up again. If you have a mig welder to hand then you could also probably achieve the same effect for free. For more info about them see here. The sound of RSRs is a fair bit louder without being too intrusive to neighbours and to cabin noise. Some complain that the noise is a bit boomy but I am pretty pleased with mine (I just would like it a bit louder still and more opened up). You don't really get popping and cracking (e.g. on the overrun) and they do allow you to hear the metallic mechanical gurgle of the engine but not necessarily all the time (and not necessarily loud enough for some tastes). The other thing is, I am told that no 2 RSRs sound the same and they sound better with age. Fitting is very easy. You just have to unscrew the exhaust tips, unscrew the clamps to the cats, then unscrew the metal strap that braces the actual body of the silencer. The only thing is, some of these screws might well be rusty so be prepared to have to use a dremel to cut into bolts, or in my case an oxy-acetylene welder to melt the heads away. TGert sends you new screws and bolts so no problems there. Also bear in mind that the heatshields that sit on top of the silencers will almost certainly be totally rusted away. You don't want your bumper melting so fit some new ones at the same time. The other popular option here is the Fabspeed supercups. These are a little more expensive but look the part and replace the exhaust tips as well. They have a different note, a more developed or 'engineered' sports exhaust sound, somehow to my ears its seems more designed for American tastes and I think overall its a bit louder as well but personally I like the rawer, less 'tuned' warble of RSRs. If you remove the baffles then its even louder. If neither of these are loud enough then consider changing the cat. Of course you can go for straight decat pipes but most people report that the car starts to sound a bit tractor-like with this option (even the turbo does which is a quieter car all round) and strays away from the sound of an actual performance car. The best option is for a high flow sports cat which is a replacement unit with a 200 or 100/inch cell catalyst element. Note that once you're at 100 cell + Louder silencers (e.g. RSRs) then the car will start to be pretty loud, possibly too loud for many tastes and beyond the noise limit for trackdays. A sportscat alone will be around 100db so throw in RSRs as well and you'll be thrown off the circuit. Gert from carnewal also makes an exchange sportscat now which works out very cheap. Design911 also offer a nice shiny one made by DesignTek. The popular choices in the USA are made by DANSK and DACH and Martin Sands but come at a greater price. Just make sure you get one that has an install hole for the oxygen sensor. And if for any reason you have a non-european OBDII car then the do not opt for the 100 cell version as you will have problems. Do change the oxygen sensor as well when you fit them, well worth doing whislt you are down there as they only last 60 or 70k miles or so. A Sports cat does reportedly give a small power gain once mapped. The man you want for this in the UK is Wayne Schofield at Chip Wizards. I know that JZ Machtech in Wembley can also map your car as well. Don't expect much more than about 300bhp but people who have had a sportscat + remap do say the gain is significant and more than noticeable. I know my car feels just a little bit flat in the midrange and could probably benefit from a map. Here are a few example sound clips: Fabspeed supercup silencers and if you really want Decibels: Fabspeed supercups with Cay bypass pipes
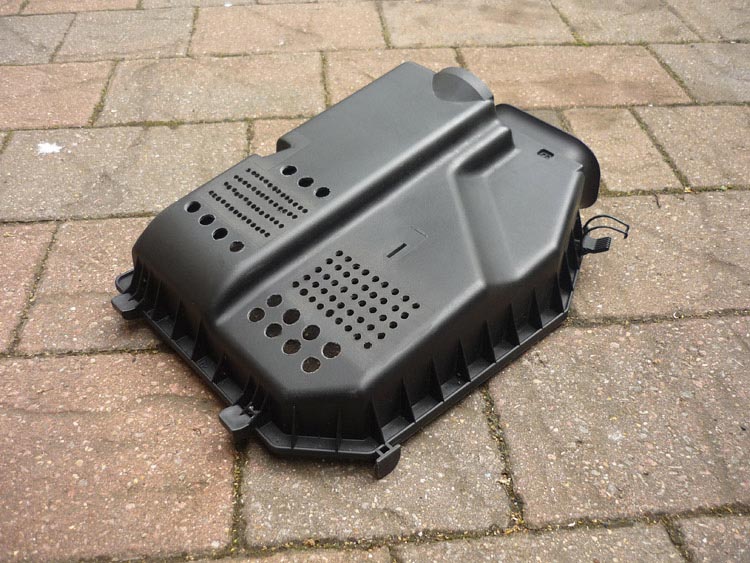
This is just a small mod. It doesn't really make that much difference to be honest. If your airbox cover has holes in it the induction noise will improve slightly so you can either pay 80 quid for an official pre-made 'motorsound' airbox cover or drill a few holes in your existing one. After testing small and large holes I settled on a mixture of both which seemed to create the best sound improvement. Fabspeed also make a completely modified cover here which effectively removes the cover altogether to expose the whole of the panel filter but given the proximity of warm engine air and no proper direct cold air feed (unless you have the RS spoiler) many believe that whilst this might be the best for induction roar it might not help intake temps too much.
|
|


